Chronicling my Long EZ construction (and a few other things).
Disclaimer
This blog is for entertainment purposes only, and is not meant to teach you how to build anything. The author is not responsible for any accident, injury, or loss that occurs as a result of reading this blog. Read this blog at your own risk.
Alchemy was the medieval forerunner of chemistry, based on the supposed transformation of matter, and was obsessed with attempting to convert base metals into gold.
Alodine would have seemed like a magical potion to an alchemy practitioner, as anything it touches literally turns to gold, or more precisely, gold color.
But let me start at the beginning, and explain what I am trying to accomplish.
The landing gear mounts will be located in what is usually referred to as the "hell hole”, basically a place very hard to reach, and to inspect. The necessity to ensure that corrosion does not affect this critical component, dictates that every possible precaution be taken. Alodine is an excellent corrosion inhibitor for aluminum, with the curious gold color side effect.
Alodine and aluminum prep
There are different brands of Alodine, and the one I chose is made by DuPont. This is some NASTY stuff, and most of the labels are covered in health warnings, so a well ventilated area, and thick chemical gloves are a must.
Fortunately the chemicals are reusable, so they can be put back in the original container when done, so you don't have to worry about disposing of them until they lose their effectiveness.
Pretty simple setup
Alodining is a two step process.
First, an aluminum part is dipped into an etching solution for a couple of minutes to prepare the surface...
Aluminum bubbling up
... then it is rinsed in water, and dunked into an Alodine vat for a couple more minutes, in order to transfer the solution onto the metal...
Alchemy at work!
...later the part comes out a beautiful gold color...
... and is rinsed once again...
... and left to air dry...
The result is pretty stunning, and the parts are now “operational”.
In case you were wondering, Alodine does not work on steel, as you can see in the next picture of my scrap test piece, where the steel bushings are still unaffected.
Once again a longeron needs glassing, but this time I decided to "pre-preg" it to keep things clean. If you just joined us, this means that I added epoxy to the fiberglass strips once they were stacked, and within two sheets of plastic.
UNI cut the long way
UNI stacked and within plastic
Epoxy added to UNI sandwich
Epoxy thoroughly squeegeed
Since last time I had a little difficulty conforming the fiberglass to the 90˚ corner where the wood meets the sidewall, I decided create a flox fillet to ease the transition.
Because this fillet is 103” (2.6 m) long, and to automate somewhat the process, I put the flox paste in a ziplock bag...
... cut a corner...
... and used it the same way you garnish a cake.
Once the flox was in place, I went back with a tongue depressor to remove the excess.
With the stage set, it was time to use the pre-preg UNI to cover the longeron in correspondence of the doubler. It basically went on like a Band-Aid, just peel the backing plastic sheet off, and stick it to the longeron.
Pre-preg in position
Using a squeegee, I gently contoured it to the longeron...
... then peel the backing plastic off...
Done!
At this point I repeated the process with two longer pieces of BID that would cover the entire longeron, overlapping in the middle.
This will be cut into two strips later
Doing "my thing"
BID ready to be cut and used
Bid strip in place
Peeling off the plastic backing
Lastly as always, I used my 1” (2.54 cm) wide roll of peel-ply to straddle the edge of the fiberglass for smooth results.
As much time as I have put into these mounts, they’ve got to be worth at least $10,000 by now!
The bad news is I am not quite finished with them yet and, as in most things, the detail work is taking up as much time as it did getting them to this point.
The latest “machining opportunity” happened because of a design flaw. Well, flaw might be too harsh a word, nevertheless it is an issue that could have been nullified with more careful positioning of the bolt holes pattern.
You see, the L channel that I used for constructing the landing gear mounts has a rounded inner corner, and this interferes with the 0.5” (12.7 mm) washers that are installed with the mounting bolts.
Washer and bolt unable to seat properly
This situation is clearly unacceptable, as it would prevent proper tightening of the bolts.
There are a few ways to deal with this problem. Obviously, I could have moved the bolt holes further in, thus eliminating the issue altogether, or ground some material off of the washers, but neither option appealed to me. I thought that a more elegant solution, respectful of the original design positioning of the bolt holes, and more challenging to my beginner machinist capabilities, would be to counterbore the holes.
Having never even seen a counterboring mill, I had to begin by educating myself first (there goes that word again).
It turns out that a regular 0.5” mill could do the job, kind of. There are a few issues with this sort of approach. First, as the mill descends on the L channel and starts cutting on the sloping surface, it gets deflected, and a poor cut pattern results. Second, and more important in this particular application, because the mill cuts with its outer edges first, it leaves a round groove that mars the surface of the part.
A counterboring mill is designed to deal with these situations, by having a pilot that fits in the hole to prevent deflection from, and ease alignment with the hole, and by cutting more evenly when plunged.
Counterboring mill
If you were to look for such a device on eBay, you’d have to be careful, because of the wide variety of configurations that exists. Some mills have an integral pilot, while others allow you to remove it and exchange it for one of a different size, giving you more flexibility. This last one is the type I chose, since I could not find an individual 1/2” counterbore with a 1/4” (6.35 mm) pilot for sale.
Unfortunately, even within this subclass, there are more configurations, some of which are not suitable to what I am trying to accomplish. Going for the least expensive set, got me a set of counterbores unfit to my situation, because they were too short and the mill holder ended up contacting the part before the cutting edge did.
Wrong counterbore purchase
I had to return them, and it cost me $35 between shipping and restocking fees. The second set I purchased was more expensive, and had more pilot/counterbore combinations by using different shaft/hole diameters. Unfortunately the 1/4” pilot had a shaft size too thin for the hole in the end of the 1/2” counterbore mill. Facing more shipping charges, more restocking fees, and needing to buy an even more expensive set, I decided to manufacture an adapter to slip between the mill pilot hole, and the pilot shaft, to take up the difference in thickness.
Having plenty of aluminum tubing scrap, I decided to repurpose an old threaded rod. I chucked it up to the lathe, drilled it, turned it, then cut it to the proper length.
Creating an adapter sleeve
Pretty tight turning!
Sleeve in position on the pilot's shaft
Exploded view of final assembly
Presto, problem solved.
I love this stuff!
So, here’s how the pilot fits in the 1/4” hole...
Highlighting the pilot's purpose
... and here’s the complete counterbore mill in position (on the wrong hole)...
"Look Ma'... no hands!"
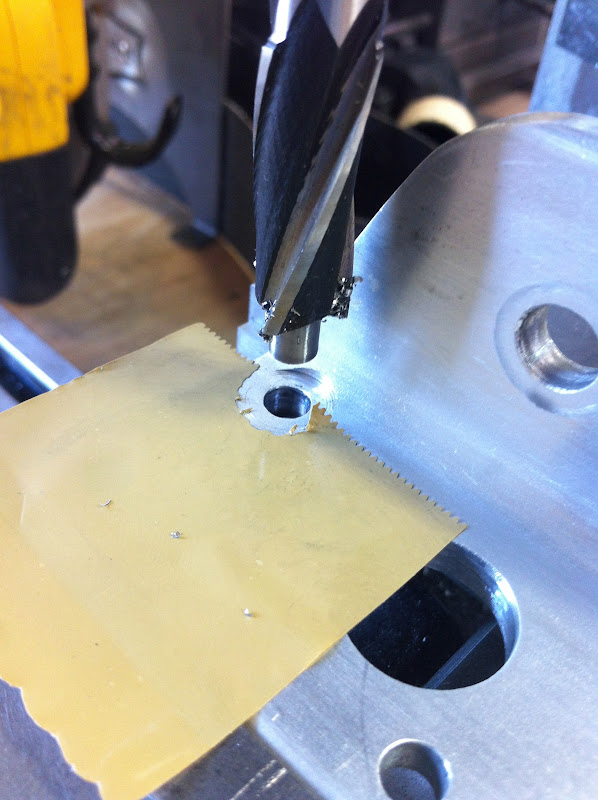
With the latest dilemma over, the next order of business became figuring out how to use the tool consistently, removing as much material as necessary, but not a gram more. I decided that to achieve this goal, I’d have to stop exactly 0.001” (0.0254 mm) short of the flat portion of the L channel.
The solution I have come up with, while it might not be the most high-tech one, proved itself very effective.
It turns out that brown packing tape is exactly 0.002” (0.0508 mm) thick.
I suppose they mean it when they say "2 mils" on the package!
So, I decided to use the tape as a “proximity alert” during the cutting operation. I did so by putting one layer of it by the hole, and stop advancing the mill when the tape got ripped up.
High tech mill stop
Eureka, it worked!
I highly recommend this method because it is easy, yet provides reliable and repeatable cuts with extremely high level of precision, as you can see in the following video.
The counterboring operation turned out to be quite anticlimactic, and all the 8 holes were finished in just a few minutes.
The final product of this operation is a proper bolt/bracket interaction that enables bolt and washer to sit flat, and allow adequate torquing during final assembly.