Chronicling my Long EZ construction (and a few other things).
Disclaimer
This blog is for entertainment purposes only, and is not meant to teach you how to build anything. The author is not responsible for any accident, injury, or loss that occurs as a result of reading this blog. Read this blog at your own risk.
I was a little apprehensive about this step, mostly because I had never worked with spar-cap material before, which is basically very thick UNI-style fiberglass. It turned out, I shouldn’t have stressed over it, because although it took 9 hours to finish the bottom side, I found the process strangely enjoyable (perhaps a reaction to the epoxy fumes in a closed garage).
Laying the spar cap
It all started with the application of clear tape to the aft section of the spar, where a dam would be erected. This was perhaps an unfortunate choice, because it made cleanup more difficult later, as you shall see.
Upside down spar with clear tape added to its aft face
I then used duct tape to cover areas I wanted to keep clear of epoxy.
Starting to mask everywhere other than the trough
Having plenty of "useless" Urethane foam laying around since I started the project, I decided to use it to build the dam that would isolate the bottom trough, and contain the spar-cap material.
As I sunk the razor knife into the Urethane, I couldn’t stop laughing. I forgot how soft this material really was, it was as easy to cut as it is to rip paper apart. As expected, the statically charged foam dust started migrating everywhere, quickly making a mess. I’m so glad I didn’t use this material anywhere on my plane.
This material is just ridiculously soft. It took a long time to get this razor knife to stand long enough for this picture.
Anyway, because the few pieces I had cut were making dust if you just looked at them, I decided to enclose them in duct tape, and vacuum up the mess.
I chose to use a glue gun to attach them to the clear tape already on the spar’s aft face (another unfortunate choice).
Using hot glue on the duct tape covered foam
Foam dam applied to the entire aft face
The hot glue solidified quickly, and built up to a discrete thickness, thus a gap developed between the foam dam and the spar's aft face. This gap got filled with flox later requiring much sanding and cleanup.
A closeup of the dammed trough
Meanwhile, the time had come for cutting the actual spar-cap material. Thing is, when the plans were first written, the UNI you could buy was a little thicker than it is now, as a result using the original layup schedule would have resulted in a thinner structural member.
Original UNI schedule from the plans
Luckily for us, Burt recognized this potential issue back in 1980, and published an alternate schedule in CP#25 (page 6), just in case thinner UNI was used.
Additional spar-cap plies due to thinner than plans' UNI thickness
Since the BizMan (aka Beasley) had graciously given me his leftover UNI tape, I already knew it was of the thinner kind, and as a result I cut the UNI layers by the plans, plus the additional layers from the Canard Pusher newsletter, and set them aside.
Beasley's leftover UNI tape going to a good cause
Funny thing is I just had enough of it to finish the bottom spar-cap, and not an inch more.
I also copied something I saw on my friend Wade's blog, a way to funnel extra epoxy away from the work and into a spare cup. I did this on both ends of the spar.
Left duct tape funnel
Same thing, right side.
After doing all of this prep, I called it a day even though it was still early, since I wanted to get started at sunup the next morning, and keep going until the bottom spar-cap was done. But I should have checked my epoxy as well, because I found the hardener all gelled up in the morning, and barely able to come out of the can.
So, the day started by making coffee in one corner of the kitchen, and heating up epoxy at the same time in the other in order to make it usable again.
Oh well!
Un-gelling the E-Z Poxy resin and hardener
When I finally got all my stuff together, I began painting pure epoxy on the shear-web.
Wetting the shear-web with pure epoxy
Then, I mixed some flox, and filled the gap between the foam dam and the spar itself.
Using the pastry bag method to lay flox over the shear-web's rounded edge
Flox completely filling the rounded gap with the rear dam
I then grabbed the first full length piece of UNI tape, laid it in the trough, and made sure all the fibers remained straight.
Laying the first UNI strips of many to come
Straightening out the UNI tape
The UNI spar-cap material has cross-threads holding the UNI fibers in place. Well, actually the cross-threads are really one long fiber weaved though it, and held in place by a red “cross-cross-thread”.
Close up of the red threads (three UNI strips depicted)
Removing the longitudinal red fiber unlocks the cross-thread that can, and should be removed by pulling it straight out of the side of the UNI tape, and discarded.
Removing the red thread
It actually came out pretty easily
Removing the one-piece super long cross-thread.
At this point I was left with only the longitudinal UNI fibers.
Those white spaghetti will actually support the whole plane one day
Concentrating on straightening out the UNI strands
It is very important that these fibers be as straight as possible in order that they might develop their full strength, so I paid close attention to this fact from this point on, and made extensive use of a secret weapon.
To be totally honest, I discovered my secret weapon accidentally just that morning, but it worked beautifully.
Perfect size!
Who knew they actually made spar-cap combs?
Please don’t tell my wife what happened to her comb, because she’s still looking for it ;-)
The next few steps were repetitive, time consuming, but pretty simple. I just poured pure epoxy on the UNI, spread it around wetting all the fibers, squeegeed the excess off the ends, combed the fibers straight, and moved on to the next layer.
Removing the excess epoxy
UNI strips getting smaller
Shorter and shorter strips of UNI are laid staggered
Many hours into this job
I'm very happy with how straight the fibers laid
Here's a good shot of the middle section
As I was expecting, I came up a little short thickness wise, and I ended up adding two full length plies, then I peel-plied the whole thing.
Peel-ply over the top
All the red threads and UNI cross-fibers added up to a small mound, and since Wade started the "UNI monster" tradition a while back, I decided to honor it (as my friend Ary already has in his blog), and create my own monster, and on Halloween 2015 of all days… perfect!
"Trick or treats!"... I mean... "Bwahahaha!!!"
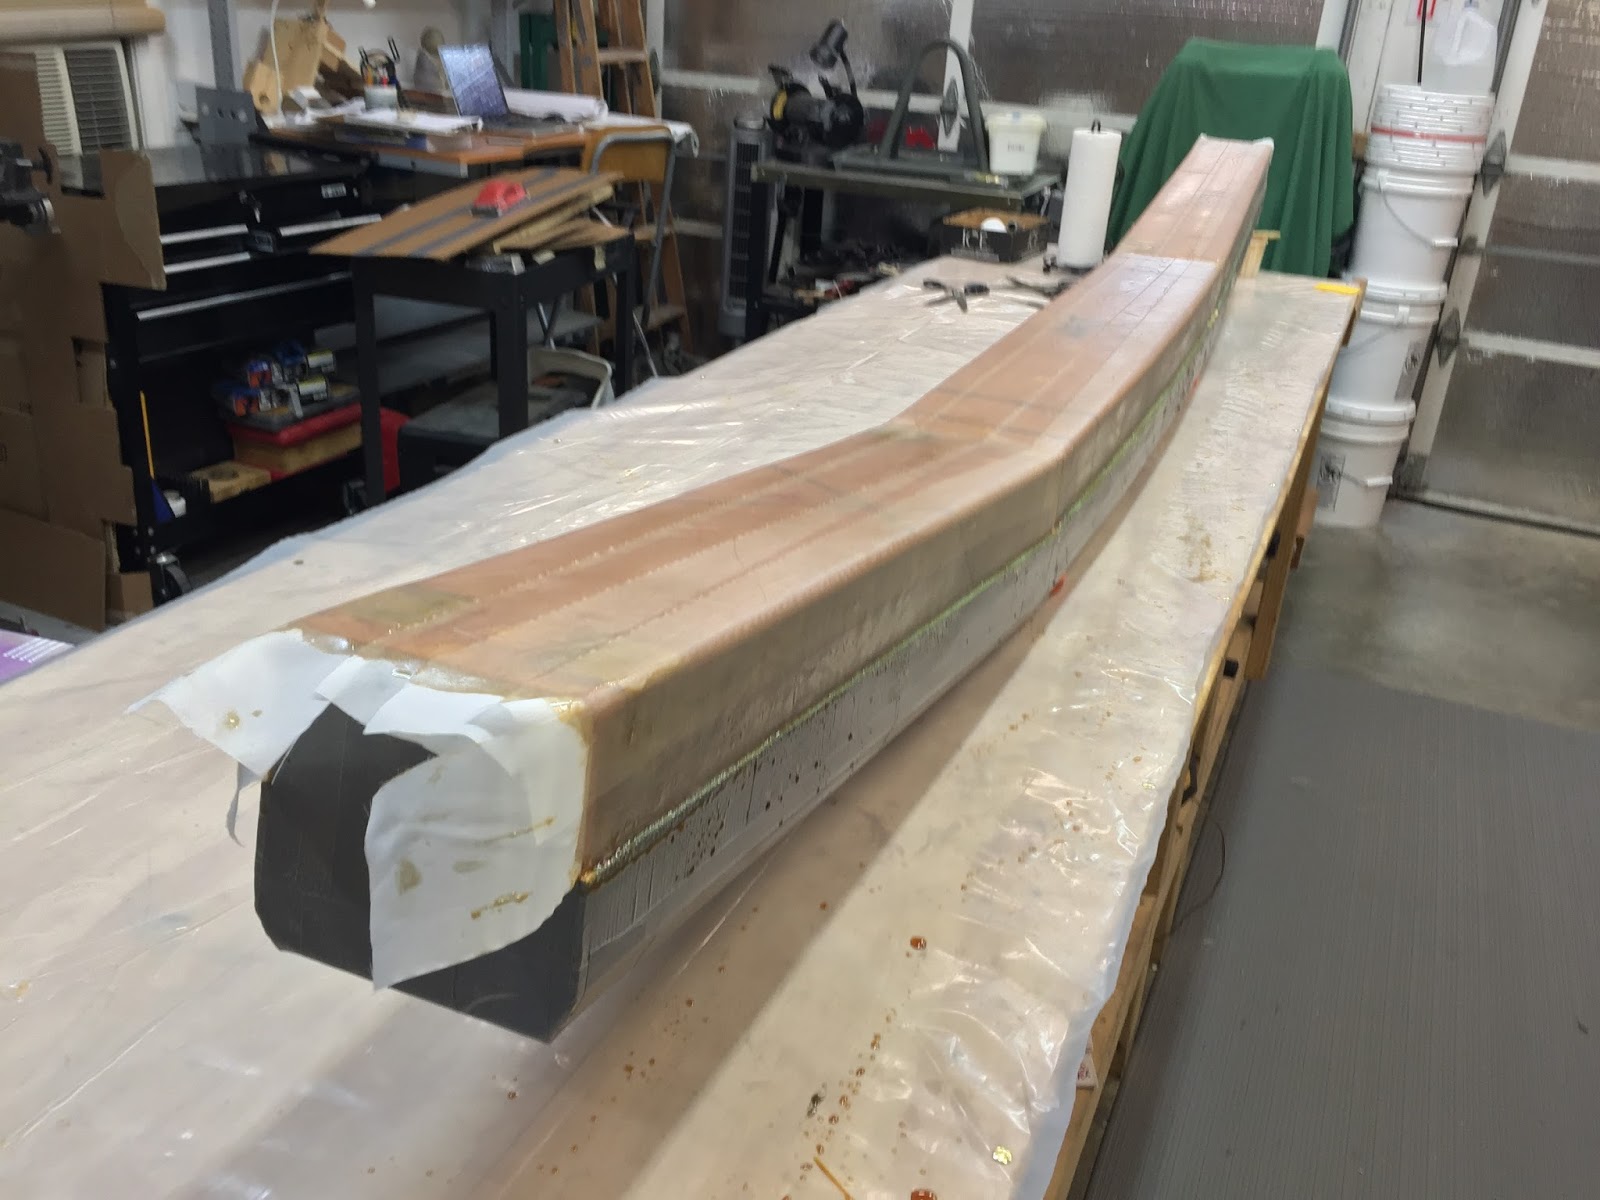
I was really excited about removing all the damming materials the next day, and reveal what my spar looked like.
All foam and duct tape removed
Yeah, it needed some major cleanup, but it looked very good overall. Unfortunately, the clear tape on the aft face of the spar got overrun by the flox fillet I had laid, and did not come out in one piece, leaving nearly invisible pieces of clear tape right where a structural layup would eventually go.
This was obviously a big NO-NO, and I had to be 100% certain I removed all of it. So, I spent two days working meticulously at cleaning up all traces of extra flox and tape. This turned out to be a very difficult detail oriented job, since I had to be careful not to damage the shear-web beneath tape and flox.
Close up of the issue
Sanding through flox and spar-cap is very tough, but care must be exercised to avoid damaging the shear-web.
In the last post, I said I would talk more about the different ways the shear-web can be laid. There are really only two ways, the original approach using BID, and the modified approach (CP#25 LPC#26) which employs UNI. The nice thing about the newer method is that it saves 3.5 lbs (1.6 kg) of weight, while retaining the original strength.
Long EZ Plan Change #26 (shear-web is layup #5)
Method #1 used 3 plies of BID at 45° with the usual 1” (2.5 cm) overlap. Method #2 uses only 2 plies of UNI also cut at 45°, these are butted to each other, not overlapped. Choosing the latter method to achieve the weight savings also commits you to modify layups #6 and #8.
I'd like to add one last word on the Long EZ Plan Change #26, just to put it in context.
LPC#26 was published in Canard Pusher newsletter #25, (dated July 1980), which was only the second newsletter to include the Long EZ design. This happened only four months after the Long EZ plans were released(March 1980), so we are talking about a modification that was done very early in the life of the airplane.
If we assumed that no one was able to build all the way to Chapter 14 during the first four months the plans were being sold, then we might deduce that there shouldn’t be any Long EZ out there using the older layup schedule, or at very least we could say that everyone (who read the CPs) was afforded the opportunity to use the lighter layup schedule.
I chose to go with the lighter schedule, thereby removing weight behind the center of gravity, a good thing since I’ll be later adding more weight there in the form of a heavier engine.
One byproduct of going with a thinner shear-web design is that the two spar-cap troughs I cut in the center-section spar last time using our templates, will now be slightly deeper than necessary.
Although I didn’t see this coming, it is not really a concern. Worst case scenario, I might have to add a layer of spar-cap UNI tape later on, to completely fill the troughs. In this situation, coming up short and having to add glass is preferable to coming up oversize, and having to shave structure off, as the maximum amount of removable material is set by the designer to 0.04" (1.0 mm).
Back to the sheer-web… nothing unusual going on here, just a bit of prep work…
This might get a little messy. Duct tape is good insurance against trouble.
I made a template to help me draw where to cut on the UNI
… then resin and hardener got mixed, and the clock started ticking…
Starting with the micro-slurry
The first 3 UNI sheets butted (not overlapped) end to end on the spar
Pure epoxy wetting the cloth. Black marker line I made along the UNI fiber starting to show.
Starting on the center part. The black marker lines help me verify the 45° UNI orientation.
First layer done.
Last ply of the second layer going down. See the 90° Xs on the other two sections?
Spar cap layup complete
Shear-web close-up over the two left LWA4
I trimmed the UNI with a razor knife, and kept the fibers from being disturbed by pressing them down with a squeegee.
I razor trimmed the excess right away
Same thing seen from the opposite end
Proper orientation of the UNI is highlighted by the 90° X
Because the two spar-caps and layup #6 will be attached to the shear-web, I peel-plied the whole thing.
This took a lot of peel-ply
Peel-plying always leave a small amount of Dacron fibers that didn’t come off with the rest of the tape. Some light sanding helped them get off my spar at once.
Spar cap lightly sanded to remove leftover peel-ply strands