Disclaimer

This blog is for entertainment purposes only, and is not meant to teach you how to build anything. The author is not responsible for any accident, injury, or loss that occurs as a result of reading this blog. Read this blog at your own risk.

Thursday, March 26, 2020

Ch 22 - Electrical/Avionics - Part 22


Panel #5 - Faceplate 

You’d think I would have learned a thing or two about upgrading instrument panels by now. Yet, as I began cutting aluminum and shaping fiberglass, I was once again taken aback by the extent of the work required to get panel #5 done. Perhaps the fact that I was only adding a COM2 (and an audio panel) lulled me into a false sense of ease. 

I should have known better, nevertheless there we were… money had been spent, items were on hand, Pandemic sadly provided plenty of time off work, and JT was quite literally “in the house!”

I was out of excuses. 

First of all I needed a new faceplate to hold all the goodies, then a new backplate (aka Junction Box) due to the new connections that would be required.


Cutting panel #5


A bit of a loose fit, but good enough.

For some reason the holes in the backplate were slightly bigger than they should have been, but precision was not necessary in this case, so I called it done and moved on. I will have to go back at a later time and figure out what happened, and also correct it in the computer in case there ever is a panel #6. 😉

If that wasn’t bad enough, I ended up bumping the faceplate while I was cutting it (a big no-no). You can see that happening 50 seconds into the video above, as I remove the MFD blank to prevent the torch from hitting it. 

As a result, the Korry-318 indicator holes ended up ¼” further up than they should have been, as well as all the circuit breakers, the bottom of the panel, and the top as well.


Panel right off the plasma table.

"Doh!"

Worse was the fact that I didn’t fully understand what had happened until nearly a week later, and by that time I had already implemented workarounds in order to save the panel, like welding shut a few holes and recutting them by hand, or reshaping the top contour by hand with a file to include a slot for the canopy’s own NACA air vent.


Bottom right hole clearly out of place
Welding 6061 aluminum
Grinding the excess aluminum off with a 60 grit wheel

Using a 120 grit wheel to get back down to the level of the panel
After some manual sanding with a progressively finer sand paper

"E voilà!" After much filing to restore the hole

That was a ton of work, but now everything fits properly.
The taller panel required a lot of fitting and trimming session with the canopy closed

Below you can see a calibrated photo of the finished panel (hence the ruler) overlaid to the CAD file in Fusion360.


Minor differences between the CAD model and the cut panel are evident

Other than that, all cuts were of very good quality using the full 45A the Hypertherm Powermax 45XP is capable of, at a snappy 240 ipm (100 mm/sec). Dross was negligible, and dimensions right on the money.


Trig ADS-B fits in the panel right off the plasma table (👍👍)

The panel was then finished the old fashioned way… by hand.


Using the template Trig provided to mark, then drill the holes.

Mounting holes worked well, though I wish I had mounted those units a little lower now.

On top of all my previous mistakes, I also built panel #5 in CAD using a practice file I had forgotten to delete, which had slightly different contours. This forced me to have to trim both sides of the panel both in real life, as well as in CAD.


We are going commando on this panel!

Oh well, panel #6 will be right on size and shape from the get-go.

Meanwhile, here’s what I had thus far…


Complete instrument panel #5 skeleton (old harness to the side)

Back view of the unit

Making sure everything fits while outside the plane

A glamour shot with the radio and audio panel 

My panel design concept specified that the panel must be easily removable as a unit, not so the radios. Naturally, the next step was to devise a way to permanently mount the radio trays to the airplane structure. Unfortunately, for this to happen more fiberglass had to be sacrificed.


"Hold still JT. It'll hurt for just a minute."
Fitting the GNS480 tray to the plane

Checking how much space I've got to play with.

At this point, in order to match the Trig's COM#2 and ADSB flush look, I decided to also mount the GNS480 and audio panel flush with the panel.


Scraps holding the radio flush with the panel while assessing brackets mounting options

This looks pretty good (to me) and fairly unique

I think the flush look turned out quite well, and gives a slightly more open feel to an already cramped cockpit. Were I to do it again though, I wouldn’t go though all the trouble since I spent five days reworking the brackets over and over in order to get the spacing just right.


Replaced the left fiberglass bracket with a new aluminum one
Connected both trays together
Added thickness to the right bracket to move the radio further into the panel

Added fiberglass thickness to the left bracket for the same reason

Added thickness to the inside of the right bracket to move the radio slightly left in the panel

Turning a scrap aluminum bar into a hole duplicator for the panel

Using the hole duplicator to transfer bracket holes to the fiberglass panel

Floxing fiberglass irregularities, later to be sanded flush for panel #5 to fit correctly

Fiberglass structure ready to accept panel #5

That was a lot of work just to get an esthetically pleasing outcome. Fortunately (or not), time is plentiful under the current global circumstances.

The next item on my list was the new Korry-318 cluster above the radios. 

Addressing this feature required a further fiberglass sacrifice turning what was left of the old fiberglass panel into nothing more than a nut-plates holder. The lost strength is more than made up by panel #5 metal structure, although in a perfect world I wished I had been able to preserve more of the original fiberglass bulkhead.

"I hate doing this to you JT, but it's for your own good."

There we go, almost everything fits now.

At this point I realized that mounting some of the switches in the location I had previously planned for them, required even more fiberglass cutting, so I decided to change their location. This required either a whole new panel, or another go at the old one with my magical hole eraser (aka TIG welder)

Luckily for me 6061 aluminum is weldable and pretty forgiving, provided you surgically clean everything. Better yet, one doesn’t need to be a great welder as long as he is a good enough grinder. 😂


Swapping holes around to save the glass

Holes welded shut

After some grinding action 😉

After more sanding

With the instrument panel rescued once again by elbow grease, I moved the holes to their final location... hopefully.


Deciding on new locations for the holes

Final, though slightly less than ideal, switch locations

Now that the faceplate is finished let’s take a look at the new one standing next to the old one…


Panel #5 (left) next to panel #4

Quite a change, isn’t it?

Next time we will dust off the 3D printer to make some new parts, and then start wiring the new panel.

Stay tuned...


Monday, March 02, 2020

Moving a LongEZ fuselage... solo.

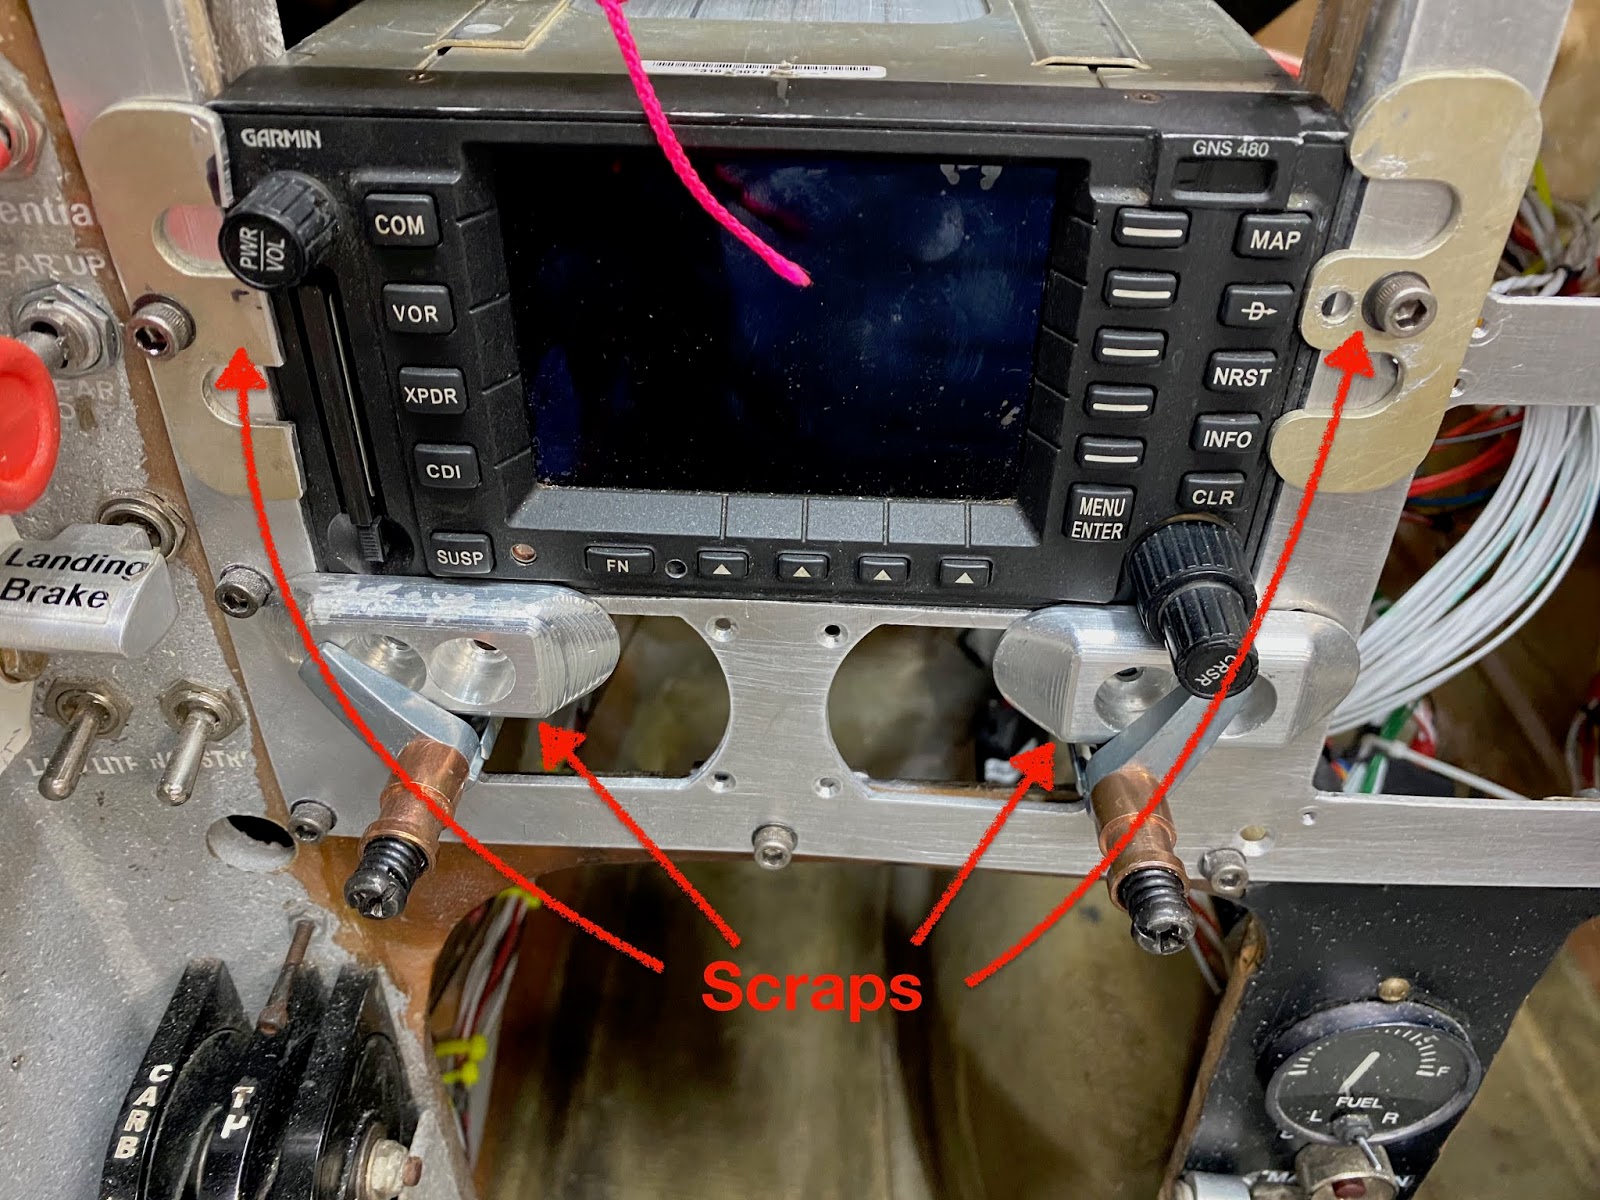
Having already made the decision to bring JT home for the instrument panel upgrade, I needed to figure out the logistics.

Objective #1 wasn't “getting JT into my shop” (that was #2), objective #1 was “not to scratch or damage JT in any way”, thus, a much higher level of care would be necessary.

Renting a 6'x12' utility trailer from uHaul was doable and cheap, but they wanted a bit too much information on what I was carrying, had to submit to a vehicle inspection, and their website was frustratingly designed to up-sell you all kinds of services. Furthermore, I would have to push and pull a thousand pound airplane up and down the ramp on my own, or depend on others to help.

I looked into a flatbed tow truck service, but it was $125 each way, so $500 total for swapping my project with JT.

I needed something I could use whenever I wanted, to carry whatever I wanted, and not have to rely on others, so I decided to buy a used trailer.

Luckily for me after a frustrating, though educational web search, I found a nice 7'x14' trailer on Craig’s List.


I really like this trailer a lot

Loading my project on it was a piece of cake, and I was easily able to push it up the ramp on my own.


My project is still very light compared to a finished airframe.

Arriving at the airport with my project felt a bit weird since it had never been to one.


The fuselage looks a little out of place near all these flying airplanes

Another first was the meeting between my project and JT.


Hard to tell from this angle that my project's fuselage is 2" (5 cm) wider than JT

It’s amazing to see how much more work there is still to be done, and the weight difference between the two. The plan for loading/unloading JT solo was to permanently install an electric winch on the trailer. I needed it to have a remote, so that I could be at JT’s side during the process rather that at the trailer’s other end, and it needed to lock in place in either direction when not powered, but have a way to unwind the spool quickly. 

Perhaps they are all like that nowadays, but the cheapest winch I found at Harbor Freight ticked all those boxes, so I snatched it up and got a mounting plate as well.


Cheapest winch I could find

Badland winch mounting plate

As soon as I got it home I started playing with it to verify it would work for the intended purpose.


Figuring out how it works

I installed the winch on a flat plate that is part of the spare tire carrier, used a battery box I purchased accidentally a few years back, bolted it to the wood floor and the metal riser, and a battery JT used until the one battery mod I made a few months ago.


Drilled and mounted the plate behind the spare tire

Bolted the winch to both plates at once

Old battery box fastened to wooden bed and metal riser

Perhaps I will shorten those wires if the battery location doesn't change.

Wiring details

Winch fully functional. Battery will be removed from box unless winching is required.

The winch had no trouble pulling the nearly 1000 lb fuselage up the ramp.


This went down as in my mental "best case scenario"

Next, I strapped JT down at a number of locations, and built some wooden chocks out of 2"x4" leftover lumber.  


I was a bit worried about the nose moving about, but it never happened.
Soft straps (in orange) connect to the engine mounts
Perhaps I went a little overboard, but wood is cheap and LongEZs are not!

Enough to keep the nose wheel from pivoting.

Snug as a bug in a rug

The truck pulled this load just fine, but lost about 4 mpg.

The 45 minute move was done at dusk, with Chris in trail with his car, to minimize gawkers tailgating me on the highway. It was pretty stressful, although it turned out uneventful. JT was solid all the way home.


Fortunately the HOA doesn't have anything written against parking airplanes in front of one's house.

The next morning work started to unload JT, and to get it indoors.


Remote winching allowed me to more around making sure the nose wheel remained straight

This was an easy one-man-and-a-winch job

The idea was to use three auto dollies, and to slide the 9’ wide fuselage backward and sideways through the 8’ door, then straighten it out and bring the nose in, a bit like a boomerang.


Ironically the hardest part was yet to come

Unfortunately, no matter how much we tried, we were always a couple of inches short in order to perform the pivot, and in the process got pretty close to losing objective #1.


"Time to go for the pivot move!"

"Sorry, no joy on this side!"

So close, yet so far away.

I was starting to feel like this was not going to happen anymore, and that I’d have to take JT back to the airport, sell the trailer, and do the work in the hangar, when Gina had the idea to try nose first. I have to say I resisted the proposal, but with nothing left to lose we tried that too.

Incredibly that got us even closer to getting in, yet still no cigar. 

Then my neighbor Lou had the bright idea of cutting some of the door trim on both sides. With Gina’s blessings the trim was cut, and JT made it in the shop just as the rain started dropping.


An extreme display of love!

Well, that's worth a good inch!

Or two!

Rain drops are starting to fall...

...but JT makes it in!

Because it's not truly home-building unless you also do some home-repairing.

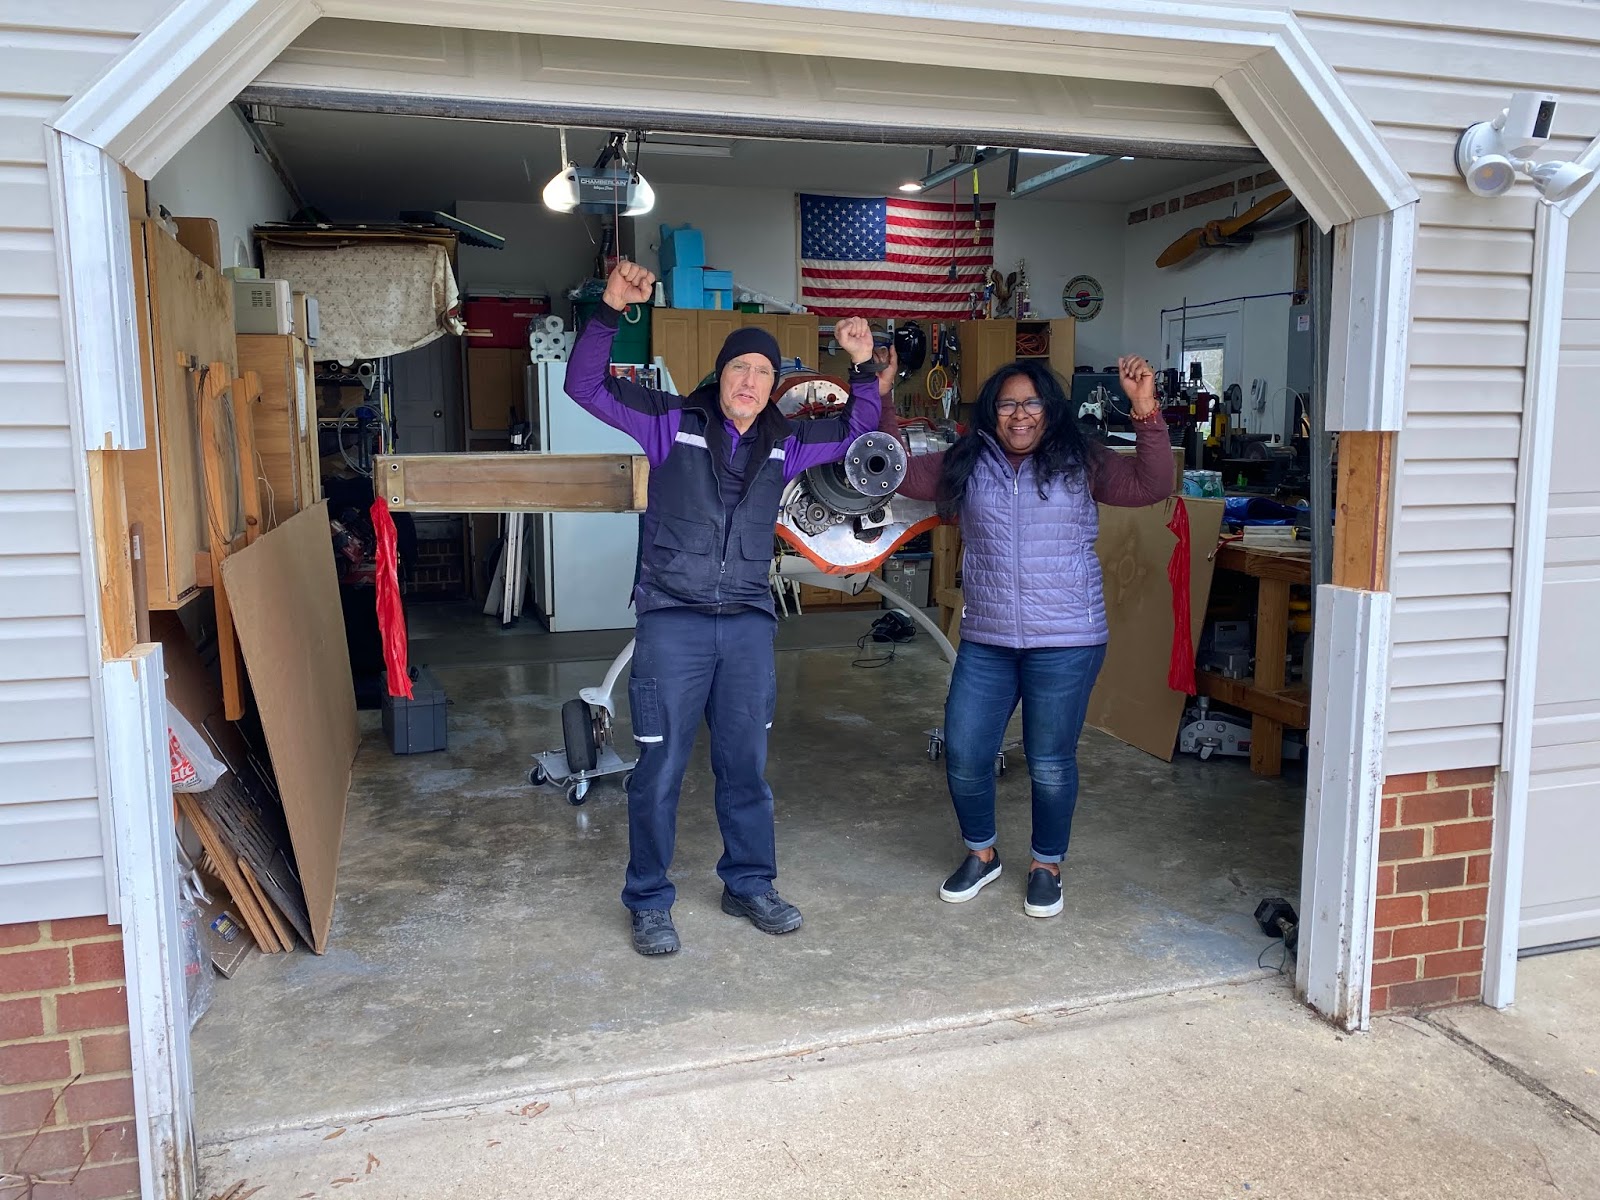
An hour later one couldn’t tell anything had happened there.


All is well again (until we need to get JT out)

With the big table pushed over a couple of feet, JT happily fits in the shop, and there is just enough room to walk all the way around it now.


JT in the surgery room

The best part of this move is that my 45 minute commute has now shrunk to 5 seconds tops. There is definitely something heartwarming about opening the garage door in the morning and seeing JT there. 

“Good morning JT!”


Now, if I could only get a runway built outside...