I thought I had taken a few more pictures of this process, but I must have gotten carried away with machining, so I don’t have too much to show today. I will just say that the nose cone was machined just like the first one I made.
The next step involved boring out the tube inner diameter to allow the heating element to slide in. The depth of this pocket reached 3.5” (8.9 cm), and it pretty much maxed out my lathe. I used the longest boring bar I had, and left it sticking out quite a bit to reach that depth.
 |
| Enlarging the hole to a depth of 3.5" |
This is not an ideal situation because it reduces the rigidity of the setup, and magnifies flexing of the cutting tool introducing vibration. Taking very light passes at low forward travel speed, and using cutting fluid did the trick quite nicely, though it required multiple passes.
Video of the boring process AKA boring video of the process
As you can see in the video, the tube is nearly completely inserted into the chuck of the lathe, this is an effort to help reduce the amount of unsupported material, minimizing flexing, and chattering of the cutting tool that would result in vibration, noise, and poor surface finish.
Unfortunately, a little bit later during the fitting process, I disaster struck!
 |
| NOT a good thing! |
 |
| Back to the drawing board! |
Yes, I was pretty upset... and not just because I would now have to machine it over again, but mostly because this failure put into question the whole retractable Pitot tube idea.
Still, I was glad it happened in the shop rather that in flight.
Over the next couple of days I figured out that, while the wall of the small tube was indeed a beefy 0.035” of steel (0.89 mm), the threading process removed enough material to make it only 0.011” (0.28 mm) at its thinnest part (bottom of the thread) and this was just not thick enough.
Armed with this understanding, I felt more comfortable addressing the issue by reducing the size of the through hole, so that the steel thickness at the bottom of the groove would now be the full 0.035” (0.89 mm).
This is now a pretty solid setup, and I actually have pressed bearings of that thickness before without trouble, so I consider this issue solved.
You might wonder whether this change restricted the air passage in the Pitot inner tube, and if this might have any negative consequences.
The answer is yes, and no.
There is now a few thousands of an inch restriction brought about by the adapter, but you have to remember that inside the inner tube there is no real airflow. Air is merely trapped as a semi-stagnant column at a pressure that depends on the airspeed of the plane, any hole bigger than a pin hole would do the trick, so there are no ill effects due to this modification.
It might help to visualize the Pitot inner working, by comparing it to the functioning of a more familiar mechanical engine oil pressure gauge. While there is a column of oil in the line, acting on the indicator, there is no real oil movement, only the pressure gets transmitted. Of course engine oil is incompressible while the air is, so there is a small movement in and out the Pitot lines as airspeed changes, but is of no consequence given the diameter of conduit that still exists, and the accelerations involved.
 |
| Highlighting the through hole diameter |
Going back to the machines, I made the new adapter.
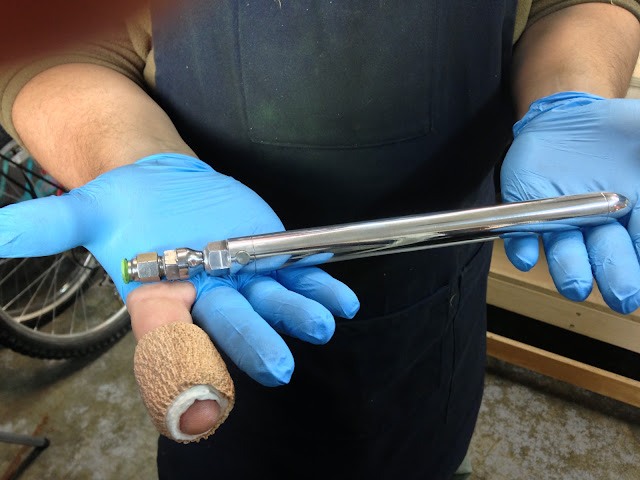
And now, let me introduce you to the first Heated AND Retractable Pitot tube for Long EZ in existence (that I know of)...
... drum roll please...
 |
| It's a boy! |
Yes, it did require a little blood sacrifice to the Pitot tube Gods (right index finger).
Lastly, I would like to show it to you in action, with a video that is probably a little over the top, but sure was a lot of fun to putting together.
Retractable tube action video
All of my design goals were met by this design, and I am obviously very satisfied.
I will be working on the electronic side next, creating the printed circuit board, and eventually put together a mobile test stand to attach to my truck, so that I can check the Pitot temperatures in the shop, as well as at highway speeds. This should help fine tune a temperature range for the device.
No comments:
Post a Comment