Chronicling my Long EZ construction (and a few other things).
Disclaimer
This blog is for entertainment purposes only, and is not meant to teach you how to build anything. The author is not responsible for any accident, injury, or loss that occurs as a result of reading this blog. Read this blog at your own risk.
The Long EZ is certainly one very unconventional airplane, so much so in fact that the uninitiated often mistake which end is the front, and which is the back.
And how could one blame them! The Long parks with the nose resting on the ground (after retracting the front wheel),engine aiming to the heavens, while the canard could easily pass for tail feathers. One should be excused for thinking it is a taildragger, except when he notices that the seats are facing the “wrong” direction.
Talk about a conversation starter. You’ve got love Burt Rutan.
About the "nose on the ground" thing… something needed to be done about that. The plans' solution was to cut “a thick piece of rubber from an old truck tire” and attach it to the bottom of the nose with a fiberglass flange.
I suppose that would have worked just fine, but over the years I’ve seen plenty of more elegant solutions gracing the noses of many a Long EZ so, once again I decided to venture out on my own, designing a new bumper from scratch, and machining it on the CNC mill (if milling rubber was even possible).
I had two antithetic objectives in mind, on one hand I needed to make sure the design would be as aerodynamic as possible, on the other I needed to maximize its size in order to have enough surface to support the weight of the nose. Searching the internet for suitable profiles, I settled on a NACA 0050, for no other reason than it was fairly wide, symmetrical, and aerodynamic by design.
I ran a computer program that calculated two-hundred coordinates for the profile, and multiplied the results by a factor of 2.5. This way I could reproduce the chosen form within the lateral confines of a 3” (7.6 cm) hockey puck.
The hockey puck idea is not new, as a matter of fact it is pretty common in Long EZ circles, but I wanted mine to be a proven aerodynamic design, and I wanted it to be easily removed and replaced, in case it wore out or I dreamed up a different design later on.
Importing the 200 coordinates in a CAD program was easy, then I spent some time figuring out how to make it removable, and here’s what I came up with…
The flared sides increase the surface in contact with the nose, and theoretically also reduce interference drag.
The actual rubber is smoother than the one these renderings depict
To withstand the side loads of the profiling operation without moving, the puck had to be bolted down firmly, and this required drilling it, then counterboring the top holes. But holding the puck down with traditional clamps deformed it enough that the hole coordinates could no longer be assured.
To bypass this problem, I designed an aluminum fixture with a depression in it the same shape as the puck, but 0.003" (0.076 mm) smaller, that would hold the puck in a friction lock. This design would enable precision drilling and counterboring operations without deforming its shape, or allowing it to rotate in the fixture. After these initial steps, I could quickly, and reliably remove the puck and bolt it down for the profiling operations.
The fixture saved a tremendous amount of time that would have been spent setting up the clamps, and finding the puck's machine coordinates (multiplied by the number of pucks I decided to make). Gone was also the danger of a collision between cutting tools and clamps.
Aluminum fixture with puck and bumper
Machining rubber proved to be a bit of a challenge with a straight end-mill. Sharpness of the cutting tool was paramount, but even a brand new one left quite a mess in its wake.
I swear there is a partially made bumper in there... somewhere.
Had it not been for the sharp cutting ball-nose end-mill, this project would have been a bust.
Freezing the rubber in liquid nitrogen would have been helpful, but I had no such setup available. Luckily for me the ball-nose end-mill used for the finishing operation left a nearly flawless surface.
A little dusty, but 100% done.
Besides a lot of vacuuming, no further operations were necessary.
Since I had bought a pack of six, I made a few extra bumpers using the same G-code.
Before and after profiling
Making the bumper
The anchor plate to be embedded in the nose of the plane would need to be precisely made if the bolts were to engage the anchor's threadswithout distorting the bumper. I chose a spacing of 1.200” (3.05 cm) between holes.
I made the anchor out of a leftover piece of ⅛" (3.2 mm) thick aluminum bar, the same one I used for the nose gear doors.
First, I measured the exact thickness of the bar and the K1000-4 nut-plates. They came in at 0.126” (3.2 mm) and 0.042” (1.067 mm). I then put these values into the “Rivet chooser” Excel spreadsheet I made (available in the Downloads section of this blog). This gave me the dimensions I needed.
This spreadsheet has saved a lot of braincells from an untimely end
Using the “recommended hole edge distance” of 0.234” (5.94 mm), I scribed the outlines where the rivets should go.
Scribing the lines for the recommended hole edge distance
Lining up one of the nut-plate’s holes with the crosshair, I center-punched that and a second one 1.200” further down.
Bottom hole positions
Next, I drilled both holes with the #40 (2.49 mm) drill, as suggested by the spreadsheet, and inserted the rivets the spreadsheet chose automaticallybased on the thickness of the materials.
Holes drilled, and chamfered. Rivets acting as hinges to locate the top holes.
Because the scribed lines were parallel to each other, all I needed to do was to drill the two top holes on the line using the nut-plates as guides, to ensure the main holes of the nut-plates would end up exactly 1.200” apart.
Top holes identified
The entire process was quick, and worked flawlessly.
Test fitting the bumper with the anchor
The next challenge was to mount the anchor to the nose, below the fiberglass skin. Page A6 shows the bumper directly below the main nose round bulkhead (NG31).
No explanation for this location is given (perhaps location isn't critical)
Given the need to excavate foam and fiberglass in an area with very thin cross-section, I was able to only partially straddle the bulkhead with my anchor point.
Marking the cut lines
Cutting carefully
Separating glass from foam is not as easy as it looks
Removing bulkhead foam
Testing the fit
Foam and micro was removed below the edges of the remaining fiberglass
I decided to add some strength a bit later, by adding 5 plies of staggered BID to help spread the weight of the nose over a wider area culminating in the rubber bumper.
Meanwhile, I had to flox the anchor in.
Keeping the anchor top surface flush with the fiberglass
Hot-glueing threads to prevent flox from sticking to the bolts(it worked beautifully)
Anchor floxed
Flox dried and surface cleaned up
After sanding the glass dull, I applied the 5 plies of BID, and peel-plied over it. Unfortunately, I forgot to take a picture of the layup until after the peel-ply was laid.
Scuffing the fiberglass dull
Using Saran Wrap to protect the threads from epoxy
5 staggered layers of BID covered in peel-ply
Highlighting the location of the 5 BID plies with the peel-ply removed
The last step was to open up the holes over the anchor, remove the Saran wrap, and install the bumper for the last time.
This departure from the plans took a bit of imagination and ingenuity on my part since I had neither a set of instructions nor drawings showing me what to do, I did however have pictures of the gear doors I was trying to replicate courtesy of my friend Beasley (aka BizMan), and that proved to be enough. For those just "tuning in" for the first time, one last word of caution before I begin. It should be apparent that these doors would never be able to close fully, had it not been for prior modifications that allow the nose wheel to stow completely within the well. These modifications are documented in earlier posts.
It almost goes without saying that, in order to create features that are symmetrical with respect to the longitudinal axis of the plane, one has to first be able to determine where its centerline (CL) lays.
I had marked such a line on the foam previously, but many layers of fiberglass and peel-ply later, it was a bit hard to see, and then only in a few spots. Using a laser and a silver marker, I recreated it anew on the outer fiberglass shell where it should be easily seen from now on.
Marking the fuselage centerline on the outer skin
My gear doors will be about 3” (7.6 cm) wide and roughly 14” (35.6 cm) long, and will be hinged on either side of the centerline, so the first task after finding CL had to do with laying out two parallel lines 6” (15.2 cm) apart.
Outlining the contour of the gear doors
Then it was time to… cut.
I become apprehensive every time I have to cut perfectly good fiberglass. I suppose I am worried about cutting in the wrong place. This time however I had been going over the whole process mentally for months, so “I had already been there before” and the cutting felt more rehearsed, and less intimidating.
Cutting the excess glass (Alea iacta est!)
With the corners gone, I used The Dremel tool with a depth stop to remove the blue foam down to ¼" (6.3 mm).
Removing foam
Foam recessed to ¼" depth
The foam I used on the gear doors came from the same sheet I used on the instrument panel, F22, and F28. The doors are actually made from scraps I have been saving for nearly five years, and protected under a cover from sunlight.
Too much info?
You are probably right. Let’s move on!
I cut the foam to fit the hole, then masked the surrounding area generously.
Foam panel fitted to the wheel well
Masking is one of those things that are very time consuming, but the more masking you do, the less frustrating the fiberglassing experience becomes, and the better the final results.
With masking, more is always better.
With such a wide "safe zone", glassing the flat panel was almost relaxing.
Usual foam slurrying just before glassing begins
Panel glassed
A day later, I trimmed the long sides of the panel flush with the new wheel well opening.
Panel cut 6" wide
Now, the door hinges will screw to two ⅛” (3.2 mm) thick aluminum anchor plates that will be embedded in the foam and covered by fiberglass, so I needed to remove blue foam to at least a depth of1” (2.5 cm). Eventually, as you'll see in later images, I ended up removing the foam all the way to the next fiberglass surface, 1.6” (4 cm) down from the outer skin.
Foam removal to 1" depth in progress
More of the same
Foam removal complete
This is where the anchors should go
The hinges would go over the anchors
One problem that I ran into, is that the router ate up some of my "mod #3" fiberglass, so I will have to fix that again.
Routing opened a new hole into the fuselage floor (top left)
Nut plates needed to be riveted to the two thick aluminum anchor plates, and lightning holes added to help the flox to grab on to.
Drilling four AN3 bolts clearance holes on both anchor plates
With a bolt screwed to the nut-plate from the back, and a Cleco clamp holding the nut-plate, the first loop hole is center-punched...
...then drilled to become the first rivet hole.
Cleco fastener installed in the first hole, before removing the clamp, and drilling the second rivet hole.
Lightening holes being drilled
Countersinking a hole (left one already done)
Microstop countersink cutter detail
Squeezing a solid rivet (left one already done)
Nut-plate permanently attached to the anchor plate (back side)
Nut-plate permanently attached to the anchor plate (front side)
Test fitting the new anchor plate
Door hinges attached to the anchor plates
Test fitting the two assemblies
With all the hardware ready to go, the time had come for installing the anchor plates to the wheel well.
Enough foam was removed behind the anchor plates to make sure they would end up flush
Improvised anchor plates holding device
Prepping the job site
Anchor plates floxed and curing
The aftermath (this will need a little cleanup)
Much better now
Testing the hinges once again
Meanwhile, progress continued on the gear doors with strategic removal of foam, and a temporary hot-glue connection to the hinges for fitting purposes.
Marking the foam for removal
Don't let the word "foam" fool you, this stuff is incredibly strong. The table saw made things a lot easier.
Sanding the leftovers was a bitch!
Let's try these babies on!
I used a hot-glue gun to temporarily attach the doors to the hinges
The proper hinge/door relation was captured by the hot-glue
I drilled holes to lock in the geometry, then I removed the hot-glue residue.
Back to test fitting
Test fitting with the gear retracter revealed a few interference issues. The first one with the gear leg cover, easily sanded away...
... the second one with the bolts that lay below. More foam was removed...
Although the location of the anchor plates turned out to be near perfect, I decided to slot the mounting holes on the hinges by 0.050” (1.3 mm) to allow for a little adjustment since I couldn’t get the doors to rest completely flat on the fuselage bottom.
... a third issue was with the hinge side of the door touching the fuselage before the free hanging side. The mounting holes were slotted.
That did the trick.
Doors completely flat in the front
No interference with the strut cover
Doors flat in the back
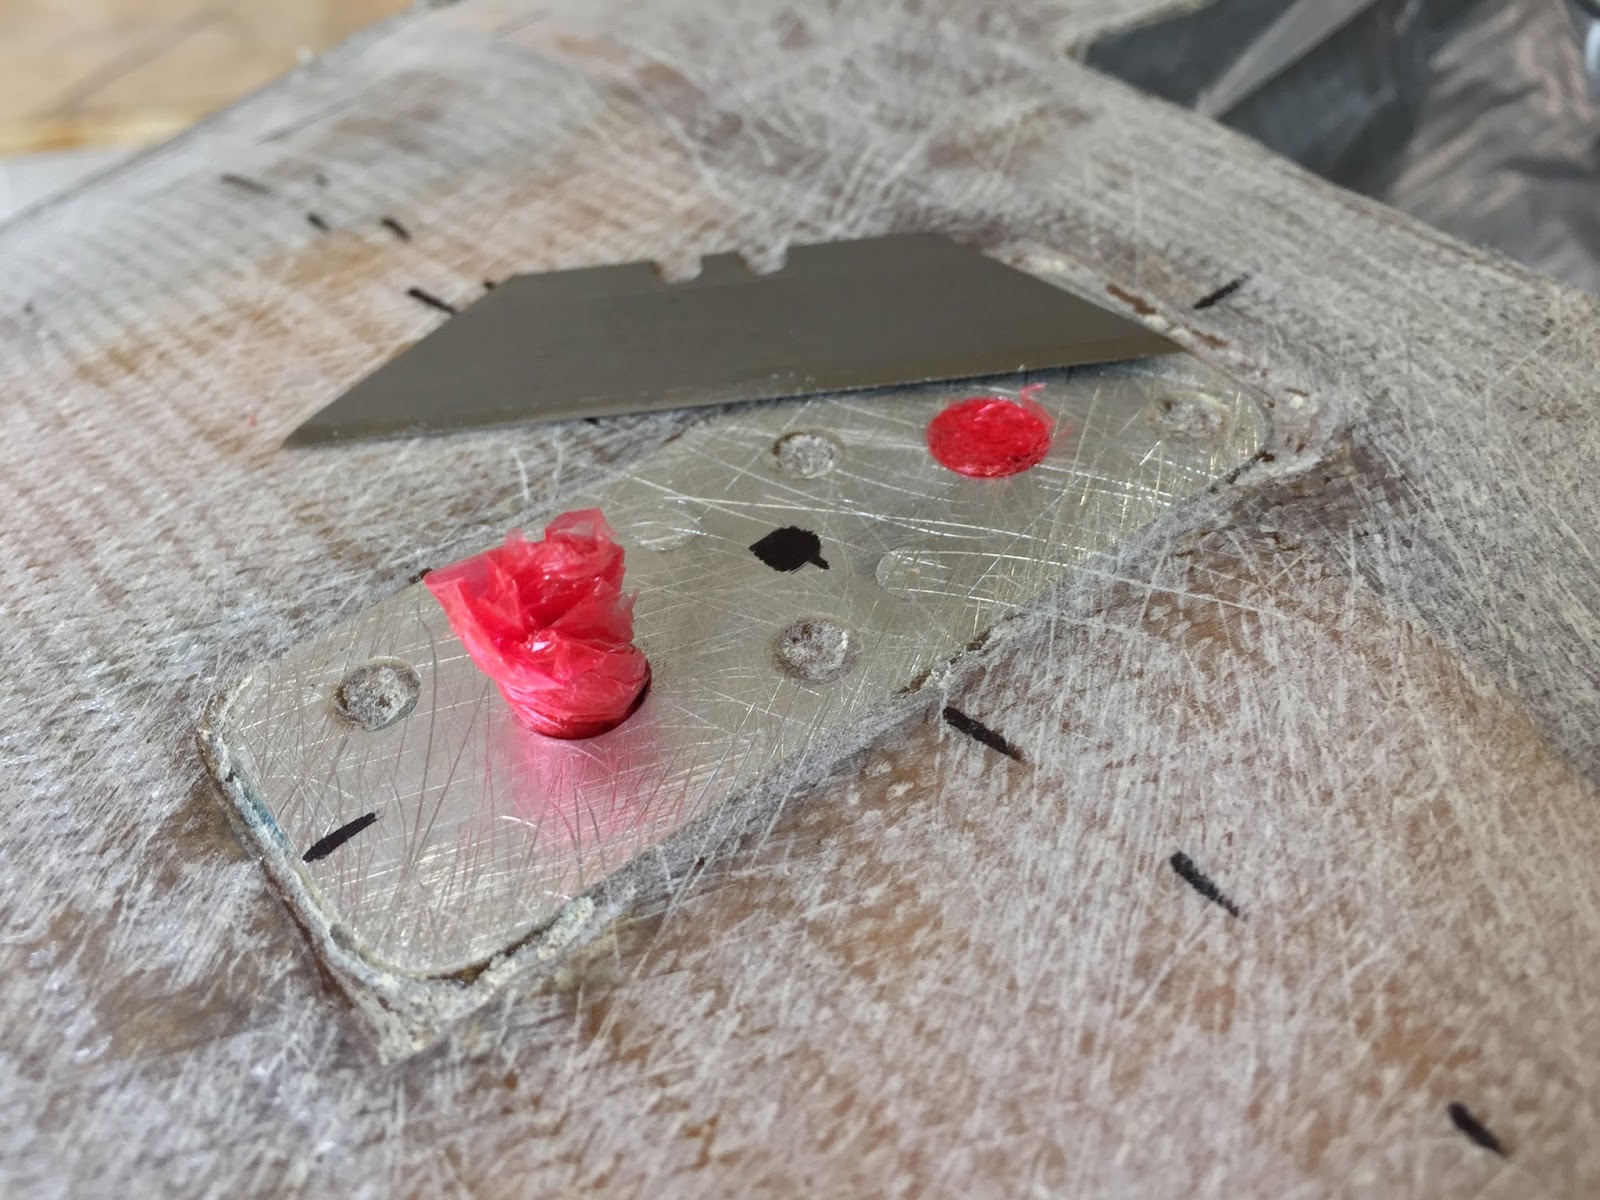
With the doors in a “happy place”, my attention went back to the wheel well. I had to plug the bolt holes temporarily, then flox the remaining gaps and intersections, and fiberglass over the top of it.
"Masking is your friend!"
Two plies of BID everywhere
Saran Wrap (in red) rolled onto itself, inserted in the bolt holes, then cut flush.
Floxing every gap and corner
Glassing job completed, curing period started.
After trimming, the next morning.
"That came out pretty good!"
Drilling an initial hole over the Saran Wrap
Enlarging as needed
Removing the Saran Wrap from the bolt hole
Bolt hole is ready to go, no further cleanup necessary.
Using this method protected the threads from the flox
The next morning I was glad to see that the wheel well had come out better than I had anticipated. Still, I had to shorten both ends of the hinges slightly because they would run into the hard flox fillets, and would no longer lay flat against the anchor plates. Easily done on the belt sander.
What I needed to do next was to finish the inside of the actual doors.
After shaping the foam as necessary to ensure a smooth layup, I added 3 plies of BID and let it cure overnight.
A little shaping was necessary
This is what I ended up with after sanding the edges of the foam smooth
3 BID plies resting overnight
Cured and flipped over the next day
After the doors were completed, the next biggest problem became how to sequence the opening and closing of the doors with the nose gear.
Since others have successfully gone before me in this quest, I saw no reason to “reinvent the nose wheel”, and I borrowed as much as possible from them. Even then, success was all but guaranteed, and failure always looming sure to follow any misstep.
I chose to go with a spring connecting both doors, and I have to thank BizMan for sharing his research on the type of spring, and the proper positioning on the doors to make it work. Without all his work I’d still be drilling holes all over my doors looking for the sweet spot.
I bought the spring at Lowes for less than $5, it is item #543578, and they can look it up on their computer by the sku# 038902002501.
The spring
In case you ever wanted one
"Some assembly required"
I started by shortening it to 6” (15.2 cm), the width of the wheel well. The easiest way to do this is to bend it, and cut it with a Dremel grinding wheel. This is hardened steel, and it’s really tough to cut with anything else.
I wore goggles and a shield for this
But it turned out to be a non-event
As far as attaching it to the doors, I made two steel cylinders ½" long (1.3 cm) to be bolted to the doors, and on which the spring would mount.
Now, I have to caution you, what I did here is temporary, and I plan on redoing these cylinders by threading the outer surface at 18 TPI. This will allow the spring to actually thread onto the steel cylinders and not slide off. I am also considering supplemental method of securing it, because I don’t want this steel part coming off in flight and hitting the propeller. That would make for a very bad day.
Largest diameter to easily fit, before the spring started deforming (I made the cylinders slightly larger).
Making the cylinders out of 4130 steel on my CNC mini-lathe
Drilling for a 10-32 thread
10-32 spiral tap in action (I love these taps!)
Cylinders ready for action
Next time I'll thread the cylinders outer surface for 18.5 TPI (18 TPI should work)
The only reason I didn’t thread them yet is that the CNC conversion of my lathe is not complete, and at this time I cannot single point thread. I still need to mount an RPM encoder on the spindle which will feed the rpm values back into the Mach3 controller software. The controller will then be able to vary the Z axis feed rate to match the spindle rpm at that particular thread per inch count.
I will post an update below when I get that done, but for now all I needed was a working proof of concept, and the slick cylinders will be fine.
Another critical dimension was where to mount the spring along the longitudinal axis, or seeing it from the point of view of the gear leg, where to have the gear run into the spring as it closed in such a way not to cause any issues.
Luckily, there is a notch in the nose wheel casting that seems made just for this purpose, so I wasted no time taking advantage of it, and marked the position line for the spring on both hinges.
Marking the hinges
The exact place to mount the spring on this semicircular line of position would greatly affect the retraction mechanics. If the spring was attached too high, the doors would try to close before most of the wheel was in the well, and if the spring was too low, the wheel might be in the well, but the door could potentially still be partially opened. Of course the length of the spring also affects all of the above, so this is where a little intel beforehand pays off big time.
Looking at photos of BizMan’s installation, I noticed that after trying a few different locations, he settled on a spot that lined up with the row of bolt holes on the hinges, so I did the same thing.
Cylinders in place on the hinges (note how they line up with the existing bolt line)
"Ok, so this is the bid idea"
The "big idea" bolted to the wheel well
The notch on the gear casting hit the spring precisely where I intended, and dragged the door closed beautifully…
Notch hitting the spring
A close up
… but the door would not open fully on its own!
Gear doors opening only partially
This was a big problem, because it meant that the nose gear could not be retracted without smashing into the fiberglass doors.
To make a long story short, it turned out that a shortened spring would recover more promptly from the over-center condition the retracted gear had forced it in, and be able to fully open on its own.
Removing one loop at a time and retesting, I found that three less loops was all it took to make it work.