Disclaimer

This blog is for entertainment purposes only, and is not meant to teach you how to build anything. The author is not responsible for any accident, injury, or loss that occurs as a result of reading this blog. Read this blog at your own risk.

Sunday, April 14, 2019

"Tooling up" - Compressor swap

I still remember the day I got my first Craftsman compressor, it was a very thoughtful Christmas present from my wife, and in the past thirty years I have used the heck out of it.


Ol' Red

I love that thing, but over the years it has become very loud, and it doesn’t help that it sits right behind my back as I work on the lathe. When it occasionally fires up, it shoots 100db right through my brain and my bones! It scares the crap out of me every time.


Actual compressor noise reading while standing by my lathe

Never mind my sanity though, the bigger problem is that the whole neighborhood is well aware of when I’m working on a project. It is embarrassing, and I have to time my operations as to not disturb my neighbors.

Additionally, since the garage back wall is shared by the guest bedroom, the bed’s headboard is literally inches from the noise maker. In the past, I have forgotten to shut off the compressor at the end of the day, only to have it go off at 3 am and freak out my guests. 

"Thousand apologies, Wade!"

Running the new plasma cutter only exacerbated the situation, as the Hypertherm consumes a huge quantity of air, air the small 22 gal tank cannot store, and that the compressor has to produce on demand. Ergo, plasma cutting equals compressor running, aka noise.

This shop situation was quickly deteriorating, and something needed to be done soon, so when Wade casually dropped the California Air Tools name, I started investigating their line of quiet compressors.

No… they are not cheap! Yes… it was a hard decision to make!

"Well played, Wade! Your conflict of interests never really entered my mind, until now."

Anyway, I rationalized the decision by telling myself this would be the last compressor I’d ever buy, and that I would be forever grateful I didn't buy something noisier every time I turned it on.

I chose a 60 gal tank to avoid having the motor running all the time. The four cylinders produce an incredible volume of air, with a ridiculously low amount of noise. Most people don’t even realize the compressor is actually running, and they think the noise is just cooling fans. When I tell them that is it, they usually start laughing.

I wasn’t laughing when the huge box showed up at my door though, and the delivery guy couldn’t get it in the shop. 

“I could have sworn it looked a lot smaller online!”


"What in the world!"

Out of the box, I was able to barely get it under the garage door. 

"Good enough for the time being!”


"My Ducati had fewer cylinders than this motor!"

"How the hell am I supposed to move this thing now?!"

And that's exactly where it remained for the next couple of weeks, as I went back to work pondering the sad truth I might have actually gone too far this time.

As much as I loved the idea, there were a number of logistic challenges, not the least of which was where to put it in an already crowded garage. But before I could even start playing the compressor shuffle game, I had to figure out how to wrestle around this 300lb behemoth on my own in a tight shop.

Searching online for a solution, I found some castering wheels with retractable rubber feet. These appeared to fit the bill, as I would be able to move it around effortlessly, then lock it in position for use, so I took a leap of faith and ordered a set.


FOOTMASTER GD-60S

The wheels fit perfectly, and worked as advertised. As a matter of fact, I am so happy with them I might even buy more to use them on other projects.


The rubber foot is lowered by turning the orange dial

With the compressor mobile, I started investigating possible locations for it, but not before running a quick test of its noise level (or lack of it).


Testing the new compressor's quietness claims


In the end, I decided to put the new compressor in the same spot the old one use to be, even though this forced me to chop nearly a foot off my bench, relocate a cabinet, and run 220v cables through the insulated walls from the recently upgraded circuit breaker panel.


Running wires for the new 220v circuit

Not my favorite task to perform, but necessary.

The old cellulose insulation my son and I sprayed in 8 years ago is holding up well.

New circuit on the right

"Ops check... OK!"

While the outcome was slightly in doubt for some time, I’d say the transplant turned out great in the end, and one could be excused for not knowing it had been there all along.


With the workbench shortened and the cabinet moved left, it looks just right.

This 60040CAD is truly a quantum leap upgrade

I am looking forward to NOT hearing the new compressor in many videos to come. 😉


Wednesday, April 10, 2019

Ch 22 - Electrical/Avionics - Part 18

Interior lighting

Flying at night is exciting, and presents different sets of challenges. I prefer “boring” day flying, but one has to be prepared in case things run long, and arriving late cannot be avoided.

JT’s current level of indoor lighting consists of a dimmer circuit connected to the fuel gauge, engine instruments, compass, and two tiny spotlights on the left and right sidewalls that are aimed at the panel. There are no other lights illuminating the rest of the cockpit which is left in complete darkness at night.


Red knob is the existing dimmer

I decided to change all of this by installing down pointing Led lights under the longerons. I will start up front, and eventually do the passenger’s compartment as well.

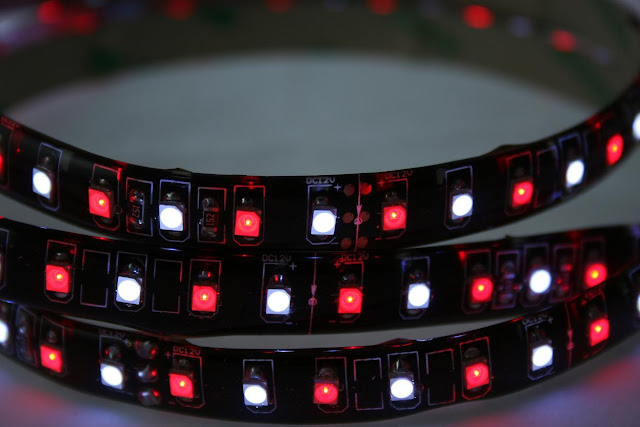
The lights I chose to install came from pilotlights.net and have red and white alternating Leds that can be controlled independently. 


2-color high output LED light strip

Each strip is one yard long (1m), and has adhesive backing. Two are required for each seat, so the total cost soars to around $200, plus additional wiring, switches and PWM controllers.

Luckily JT’s dimmer is a PWM controller, and it just so happens that it has one last "channel" available that can be used to control the Led strips I’m planning to install.


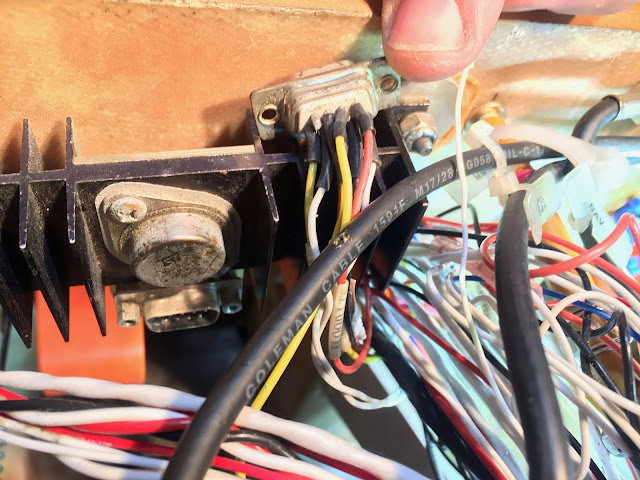
Yellow wire is the open PWM "channel"

The d-sub used with the PWM controller was the soldered kind and was in pretty rough shape after 15 years, so I  replaced it with a crimp-on d-sub type.


Wires were literally breaking off the old soldered-type d-sub 
Figuring out where to run the wires

One has to become comfortable soldering in any number of locations

One at a time all wires were replaced, and the old d-sub was history.


"Thank you for your service!"

The new interior lighting makes it possible to perform any number of tasks, such as reading the checklist at night, or writing clearances on a kneeboard, just as easily as one could do during the day.


Red lights to preserve night vision

White light to really see what's going on


The white lights could be appropriate during preflight and post-flight duties, whereas the red lights can illuminate the cockpit while preserving night vision in flight. 

I added black heat shrink over the canopy lock mechanism to reduce the reflection of the lights on the bare aluminum rod.


Slipping black heat shrink tube over the canopy lock tube

Light reflecting off of the canopy locking rod was greatly reduced by using heat shrink

I used a three way switch White/Off/Red in conjunction with the  existing cockpit dimmer.


One three way switch and a dimmer is all it's needed


Led lights and dimming in action


Another suitable PWM dimmer is the KR6 from www.kicklighting.com. I will be installing that in the passenger's compartment.


PWM dimmers

Here’s the schematic of my generic installation…


I think this is an easy upgrade that can dramatically impact safety of flight at night.


Monday, March 04, 2019

Ch 22 - Electrical/Avionics - Part 17

Exterior lighting

The journey to convert JT from a VFR fun machine to a more all around worthy ride continues with a long overdue upgrade to the exterior this time.

“We are talking LED lights … Baby!”


Perhaps not these

“But why”, you might ask?

“Hmmm… I see your point. Let’s take a step back for a moment.”

While owning JT (the flying EZ) has been a blast for the most part, she has been suffering from an intermittent strobe light. ðŸ˜±

I know... strobe lights are supposed to be intermittent, this one however was intermittent in the sense that it would choose when to work and when not to work. Now, I am sure the strobe didn’t start acting up the day I bought the plane, so why hadn’t it been fixed?

In my opinion there were two reasons for this. One, the strobe power supply box cost around $550, and two, it resides in the ever inaccessible strake

I struggled with this decision myself because reaching the power supply in the right strake would mean removing the right wing off of the airplane. If this sounds like a big deal, that’s exactly how I felt about it, even though in the past I had once helped my friend Walter to remove and reinstall his wings. 

Last summer however, an unrelated maintenance task forced me to remove both wings (this will be the subject of a future post), so it became go-time for addressing the strobe light situation.


JT "naked"

Wheelen lights/strobe power supply mounted in the right strake

A close up of the boat anchor

JT's original lights

As you gathered by now, I decided to get rid of the existing Wheelen system, and upgrade to the Wheelen Orion. While this doubled my bill, it did offer a few advantages, weight being one of them. Because it is so difficult to remove weight from these small planes, when given the opportunity to remove 2.1 pounds (953 gr) that far back in the CG range, one cannot pass on it.


Be careful choosing your LED lights, as some do not satisfy FAR 91.205 (c) night flight requirement

Not requiring a power supply that could go bad, makes LEDs more reliable, but the cool factor was certainly another big reason. LEDs nav lights are so good looking I had been lusting over them for a long time. 

If this was not enough, there is also no need for heavy shielded cables, and no issues with electromagnetic interference.

“Not convinced yet?”

“Wait, there is more!” 

Power usage went from 7 amps down to 3 amps, and they have the same footprint as my previous ones, so no fiberglassing, no drilling… nothing!

“That’s it, I am sold!”


Old lights, 246 grams each.

New lights, 241 grams each.

Replacement was quick and easy, and though not strictly necessary, I reused one wire from the old system and connected left and right LEDs to each other so that the LED strobes would flash at the same time (it’s an optional feature).


As good looking as JT already is, she looks even sharper now.


But wait, there’s more!

JT's landing light is an absolutely beautiful 250W GE unit, but  the amount of power it requires literally overwhelmes my electrical system, and causes the Low Voltage light to come on. Needless to say I have never used it much, even though I would have liked to.

Introducing the Teledyne Alphabeam plus…


Teledyne Alphabeam plus

Though slightly heavier, the Alphabeam is a direct replacement for the GE light, uses only 45W for the same amount of illumination, and its whiter light makes it easier to see in the dark compared to the yellowish GE output. 


Old GE light, 229 grams.

Gained 172 grams, but also the ability to use it.

Diameter is the same

This LED light doesn't care which wire is positive and which wire is negative

Reusing the original landing light bracket

Used silicone to glue it in


Silicone curing

The new look

Cut a piece off the old radio bracket...

... and pressed it into new service.

Landing light in the deployed position

Looking like ready for business


"Now, that's what I'm talking about!"

The thick and heavy landing light wires went straight into the trash, and were replaced by lighter gauge ones thanks to the diminished demand on the electrical system.

With the outside lighting under control, I shall soon be directing my attention inside the cockpit and passenger compartment in order to shed some light on that situation.