Disclaimer

This blog is for entertainment purposes only, and is not meant to teach you how to build anything. The author is not responsible for any accident, injury, or loss that occurs as a result of reading this blog. Read this blog at your own risk.

Wednesday, June 07, 2017

Ch 22 - Electrical/Avionics - Part 2

Panel choice

Let me just skip to the chase and give it to you straight, then I’ll discuss a few of my reasons.

I chose two GRT Mini-AP, and I'm also switching radio to a Garmin GNS480 GPS/NAV/COM.


This is what the new panel will look like (everything to scale)

Forgive the model, he was a bit excited.

“But wait a minute… didn’t you just install an IFR Garmin GPS/COM radio?”

I can see this might be a little confusing. Allow me to explain…

To tell you the truth I did initially plan my whole panel upgrade behind the GNS300XL, and some sort of small EFIS (Electronic Flight Instrument System). Although not the most intuitive of boxes at first, the 300 works very well, and I have been slowly getting more used to its menu structure, and where to find what I need in flight. However, when my buddy Wade (under my recommendation and a whole lot of his own research) purchased a GNS480 for his Long EZ, I felt both happy for him and jealous at the same time.

The 480 has a real FMC-like menu structure and feel, akin to what I already use everyday at work. The 300 in comparison feels more like a backpacking GPS installed on a plane. Perhaps I’m being a little too harsh.

Anyway, during his radio search Wade developed quite a few contacts, and to his credit he had kept an eye out for me, sending a few good deals my way every so often, even though I kept refusing them. You see, I did not want to pour any more money into this project at the time, but when his last good deal came about, a GNS480 at half price from a trusted source, I just had to say yes first, then figure it out the details later.

As you might have realized by now, Wade is a real gem of a friend, and I am lucky and honored to count him among mine.

The GNS480 came out of an RV7 that was upgraded to newer Avidyne radio.


Garmin GNS480

The deal went down smoothly, and the radio arrived in working order as expected. 


GNS480, tray, backplate, and memory card reader.

That's one good looking box!

Yep, I will have to figure out what each pin does, and what to connect it to.

Fortunately not all pins are used for every installation

The card reader will be used to keep the IFR database current

I also purchased an additional docking station for two reasons… number one, I wanted to check it out immediately upon arrival to make sure all was well… and number two, this is a very capable radio with an incredible amount of features, and there would be no way I’d be able to learn how to use it on the plane while burning expensive 100LL fuel. One really needs to be able to sit in front of this radio at home, and “play” with it over time to become an expert user.


The docking station was a bit expensive, but a definite must have.

As with all great deals, I ran into a snag, as the software version of this older model radio was out of date. This had the potential of being a pretty big deal, since sending anything to Garmin for any reason incurs an entry fee that runs into the multi-hundreds of dollars before they even take a look at it. To make a long story short, after a couple of weeks of research, a bunch of calls all over the US, and a few moments when I thought I had been had, I found a local avionic shop that was able to update the software, and also soldered a new battery to the motherboard for $180, and did it overnight! Amazing.

In case you didn’t know, the 2.4 update to the GNS480 does a number of things, the most important of which is to enable precision GPS approaches. 

Now that is a very BIG deal!

So, what have I gained by switching from the 300 to the 480, you might ask? 

Well, the best I could hope to do with the 300 was to fly "run-of-the-mill" GPS approach, if one existed at the destination airport. The weather minimums for such an approach vary, but at my home airport they get as low as 400’ AGL (Above Ground Level), not bad at all, and a limitation I would have been very happy to live within. However, the GNS480 can pretty much do any kind of approach like ILS, LOC, VOR, normal GPS, and precision GPS. With this box, and depending on what’s available at the chosen airport, the minimums go down to as low as 200’ AGL (100' AGL if some of the runway visual aid are in sight). This is a big improvement, and opens up a ton more options for getting home safely.

For those of you curious about this box, I’ll link two excellent training videos I found online on how to operate the GNS480. Mind you the Garmin GNS480 is a rebranded Apollo CX80 after Garmin bought out Apollo.


Garmin GNS480 Pilot's Guide


GNS480 In Flight


But enough about radios, let’s talk EFIS!

Why did I go with GRT Mini, and why the Mini-AP?

Well, Wade had been talking to me about GRT for quite some time, but I honestly never really liked the look of the platform. Having used a few different EFIS designs over the years on a number of commercial airplanes (B757, B767, B777, A320, CRJ, and BA4100), the GRT graphics always seemed a little... let's just say "home made" to me. 


GRT's Mini-AP in PFD (Primary Flight Display) mode.

I did like the look of Garmin's and Dynon's displays over GRT's, but when I saw Wade's Mini-X in person I was pleased it was actually better than I had anticipated. 

After downloading the GRT manuals and comparing features, I was astounded at what GRT Avionics had been able to pack into their product. Neither Gamin nor Dynon could compete in this small form factor, at this time.

Pretty much if you can name it, GRT can do it… autopilot coupled Synthetic Vision approaches, Highway in the Sky, Obstacle depiction, color coded Terrain, Traffic, Weather, Flight Director, Engine Instruments, Angle of Attack indicator, Height Above Touchdown Zone readout, the list goes on and on. They also do some stuff I couldn’t even name at the time, like Google glasses Head-Up display! 😱


So much information packed in such a small footprint

Your typical "dumb" HSI/DME/RMI/GS indicator 😛

Yep, this course will run you into the side of a hill (highlighted red)! Talk about increased Situational Awareness! 😎

Customer support has been very friendly before and after my purchase, and I worked with salesmen and engineers alike over the span of a few weeks designing my own redundant IFR system based on two Mini-AP.

So, why the AP and not the Mini-X? 

While the X is probably a slightly better deal given its cheaper price, I wanted to be able to run the GRT autopilot servos from either one of my Minis via a Source Select switch for redundancy (in case of one EFIS failure). True, the X could do most of it, if one purchased the optional software, as a matter of fact the Mini-X can almost be turned it into an AP if you add enough cash, but I decided wanted the benefit of full vertical guidance like Indicated Airspeed, Vertical Speed, or Glide Slope capture ability right off the bat, as opposed to just an Altitude Hold mode.


I think this should be enough info to get your gears spinning. Next time I’ll get into more details about my specific panel design.


Tuesday, June 06, 2017

Ch 22 - Electrical/Avionics - Part 1

Panel upgrade

Upgrading from what? You might ask, and you’d be correct in assuming I’m skipping a little foo far ahead... at least with this airframe. 

I know, I know, this blog was supposed to be about my Long EZ build, but I have decided to do what I told everyone I wasn't going to do, a partial instrument panel upgrade on my already-flying airplane (the one Terry Lamp built), and pretty much everyone has told me they want to know what and how I am going to do it. So, it seemed fitting to share it here, with a crowd who’s already interested in such things. Besides, what I will have learned with this upgrade will be instrumental (no pun intended) when the time comes to wire up my other panel.


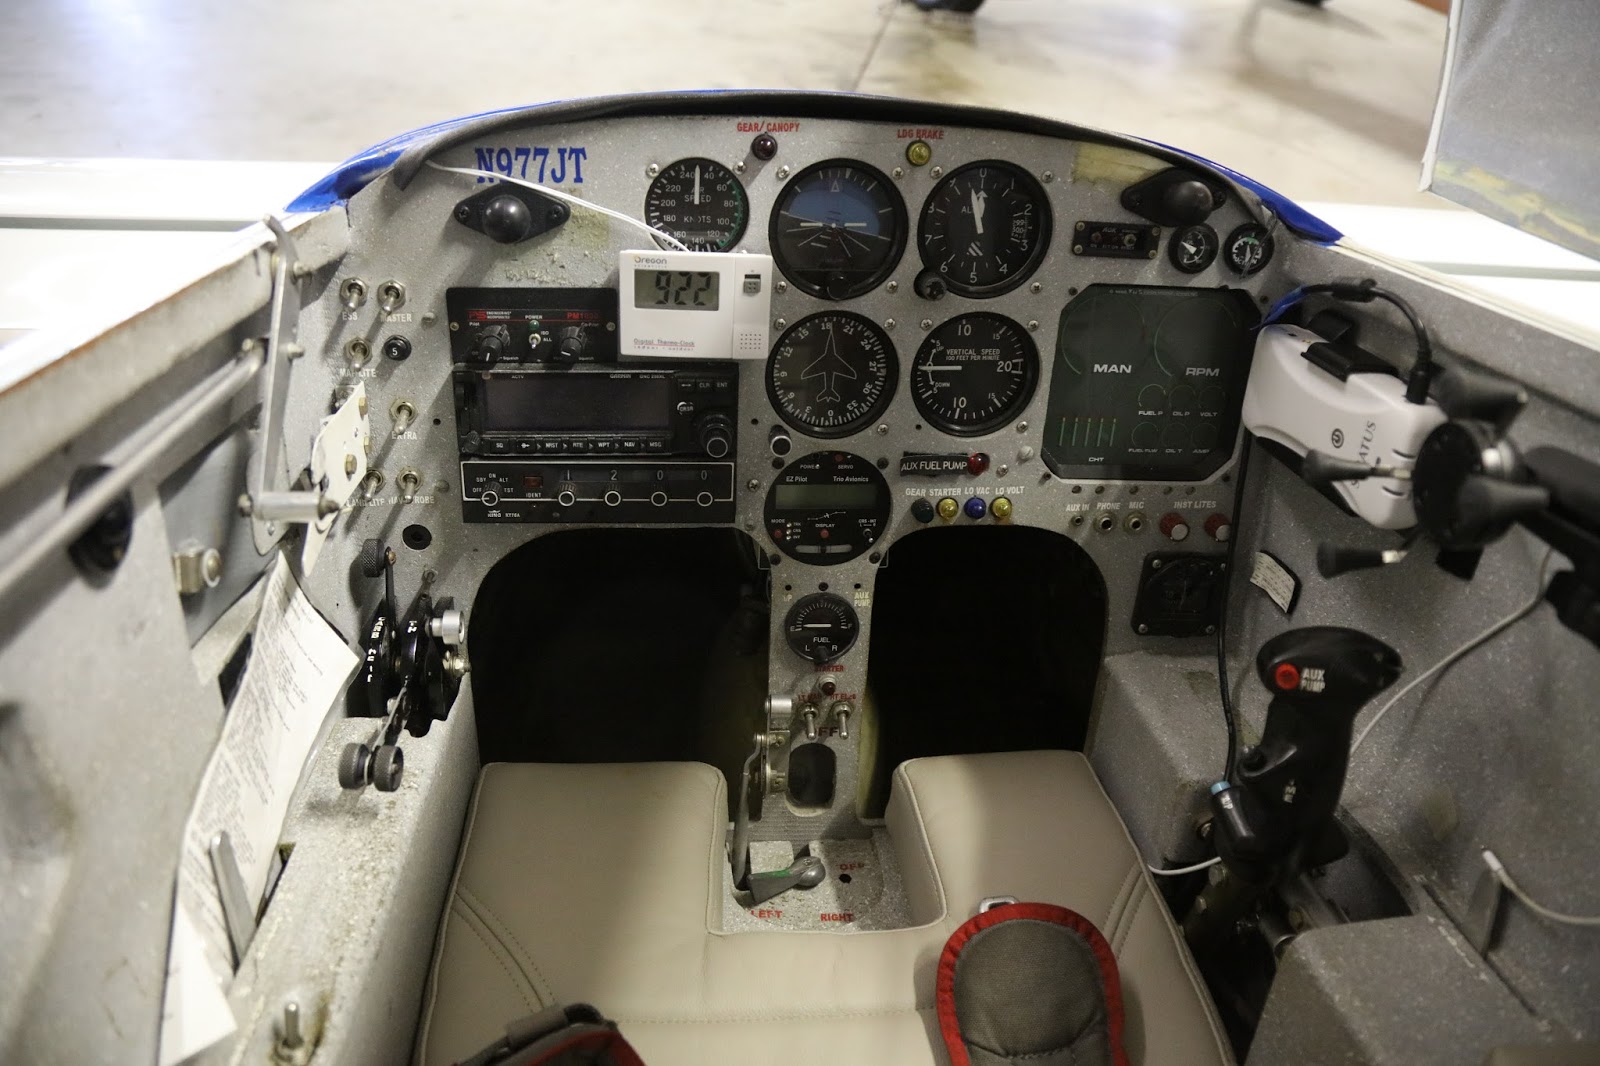
Instrument panel as is. I plan on keeping the engine instruments cluster (far right).

Flying Terry’s plane has been just awesome, however I have reached the point where I just need more utility from it if I am to enjoy it on trips longer than a couple of hundred miles. You see, longer trips present a recurrent problem… one is bound to run into weather conditions that are not conducive to VFR flying (Visual Flight Rules). This greatly reduce the usability of the plane, and has the potential of becoming dangerous.

Mind you, I’m not looking to fly into “bad” weather, I get enough of that at work already, but it would be nice not to get stuck places just because a cloud deck rolled in while enjoying the proverbial $100 burger away from home, and so far I have avoided quite a few trips to visit friends (that I could have probably flown) out of an abundance of caution. I hate being at the mercy of the VFR gods every time I want to go somewhere.

Terry did a fantastic job putting together a very safe and redundant VFR plane, indeed it has most of what one would have wanted in the late 90's to make it IFR (Instrument Flight Rules) capable. The plane however is not certified for it, although the Operating Limitations certificate does not disallow it, stating that it is certified for day VFR unless the equipment stated in FAR 91.205 are also installed (I'm paraphrasing).

That equipment gap is what this panel upgrade will have to address.

Technically, I took my first step down the upgrade path a few months ago, when I replaced the VFR only GPS/COM Garmin GNC255XL with a Garmin refurbished, IFR capable GNC300XL. This radio was the obvious choice for a quick upgrade since it is physically identical to my previous unit, and the swap is just a matter of replacing it in the radio tray, no rewiring necessary.


Garmin GNC250XL (VFR GPS/COM)

Garmin GNC300XL (IFR GPS/COM)


The swap was easy, but a bit more is required for IFR flight.

The GNC300XL manual specifies that a CDI (Course Deviation Indicator), an altitude encoder source, and an annunciator panel are also required. You can see most of those in the next photo of an RV6 panel that belongs to friend of mine.


Some of the items needed to make a GNC300XL installation IFR

Like my friend, I would have built my own annunciator panel, but unfortunately for me I have no additional space in my small instrument panel for a standalone CDI. 

I wanted to do the least amount of modifications to the plane, but it started to look like anything new I tried to fit in the panel would require cutting bigger holes into the fiberglass. Pretty soon it became obvious that some of the panel could not be saved, so my next priority became cutting the smallest possible hole to install the necessary instruments.

The good news with having made the cutting decision is that the instrument choice became quite ample. So, let’s take a look at some of the available options (in no particular order)


GRT HXr 10.4" plus GRT Mini-AP

GRT HXr 8.4" plus GRT Mini-AP

Dual Garmin G5

Dynon SkyView HDX1100 10" plus Garmin G5

Dual Dynon D10

Dynon D100 plus Garmin G5

Garmin G3X touch

Dual GRT Mini-AP

GRT Horizon Hx 6.5" plus GRT Mini-AP

Dual Garmin G3 Touch 


My current plan is to replace a small portion of the instrument panel with an aluminum plate on which the new instruments will be mounted.


Stay tuned, because next time I will share what I chose to buy, and why.


Saturday, May 27, 2017

Ch 10 - Canard - Part 13

Top skin (12.5 hrs)

Now that the VOR/LOC and GS antennas have been permanently mounted on top of the canard, I can finally apply the top skin consisting of 1 UNI, 1 BID, and 2 UNI.

As usual the manual is overly optimistic about how long this process should take. It specifies 2 hrs for 2 people. So, I took it to mean 4 hours for one person. From prior experience I learned to at least double that to 8 hours, a long day, but doable. 

I was very disappointed when I was nowhere near finished at the eight hour mark. Twelve hours after I started, I finally rested squeegee and paintbrush on the table, and went to bed with enough aches to keep me awake most of the night. Getting old sucks!

Let’s see how it went down…

In Part 8 I showed how I was able to get a very clean 1/2” (1.3 cm) of bare fiberglass at the trailing edge. This is a structural requirement and it is very important to the overall strength of the canard. I marked an half inch line along the trailing edge to make sure I would not encroach on this limit.


The trailing edge had been peel-plied, but it got sanded anyway as a precaution.

I then masked off every bare fiberglass surface that I did not want to contaminate with the micro-slurry I’d be using next, and started patching up dents and holes in the fiberglass with dry-micro.


Masking to keep micro balloons at bay

The process of removing the trailing edge peel-ply described in Part 8 left a step in the foam that needed to be smoothed out. I made a popsicle tool for this job which worked okay, though not perfectly. Nevertheless it proved sufficiently useful to be pressed it into service.


A little dry-micro fillet is needed near the trailing edge (hence the tape).

I had high hopes for this popsicle tool

It was designed to extrude the perfect fillet

Popsicle tool in action

Before and after popsicle tool use

Then it was slurry time!


Nothing new here, if not for the amount of surface to be covered.

It’s amazing how much surface there is on a canard. I bet the wings are going to be a real tough job!

Anyhow… I removed the tape, and revealed a perfectly preserved trailing edge and spar-cap just begging for some pure-epoxy, but first a little more masking would be in order to keep epoxy off the metal pipe, and from running back under the bottom of the trailing edge.


Trailing edge and spar-cap peel-ply removed

More trailing edge masking

After obliging the bare fiberglass requests for epoxy, I started laying up UNI. Glassing solo, the UNI laid up nowhere near the way I had intended, so I had to straighten up every individual fiber by tugging at it from other ends of the canard, and did my very best to keep the cross-fibers in line as well. This necessary attention to details ate up a lot of time.


First ply of UNI

Fibers straightened and edges trimmed

Seen from the other side

Next it was BID time! Laying BID solo made me wish I was back doing UNI again. This stuff really has a mind of his own, but I eventually wrestled it straight again. However, I had to do this four times due to the small pieces that get laid at a 45º bias.


BID took forever to straighten back up

This stuff gets skewed just looking at it!

Piece #2 of 4

The front edge gets wrapped around the leading edge of the canard

Working the far end pieces of BID

To avoid a surface bump, these BID pieces are butted not overlapped.

Even then, I did get a tiny bump that I'll have to take care of during finishing.

I was glad to get back to UNI again, and worked on layup #3 and #4 next.


Approaching hour 9 I'm back to UNI (ply #3 of 4)

Hour 12, (ply #4 of 4) declaring a truce.

Mostly finished canard

After the last ply of UNI I peel-plied the ends since some tips will be added at a later date. I then copied my buddy Wade, and applied some dry micro to smooth the small kink on the trailing edge my popsicle trick hadn’t completely eradicated.


Dry micro fillet over the still wet fiberglass

Peel-ply will help when the tips get mounted.

I was pleased at how the cables exit from the canard turned out.


This spot is not aerodynamically active since it is buried into the nose

All fiberglass cloths were wrapped around the bottom of the leading edge of the canard for a distance of about 2” (5.1 cm). This effort was helped by the clear directions on the plans to overhang the canard off the bench, but hindered by having to be on one’s knees for a long time, working a paintbrush loaded with warm epoxy uphill, while the stuff runs over one’s gloves and onto the arms.


Time for curing at last

The last hour was certainly the hardest, and when it was over I left the shop without even cleaning anything up (a first on this build).

As I had to go to work early the next morning, it wasn’t until a week later that I was able to rip the canard off the jig, and trying it on the fuselage for a photo op. 


Canard pulled off the  jig
Trying the canard on for the first time
It's amazing just how big the canard really is