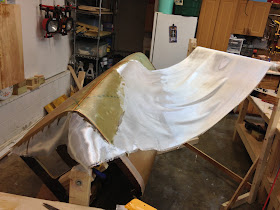
Glassing the outer fuselage (23.0 hrs)
While I wouldn’t recommend glassing the fuselage by oneself, that’s exactly what I ended up doing for a number of reasons.
The main difficulty consists in the amount of time required to complete the job. Sure, the manual says that it should take two guys 4 hours to complete the job, but I’m starting to get the sense that the numbers in the manual might be a bit optimistic.
I ended up spreading this job over the course of two days, mostly to make it easier on my back. I completed the right side of the fuselage on day one, and the left side the next day, peel-plying the seam in between.
The level of technical difficulty is not great, but the sheer size of the fuselage was enough to make me wonder if I’d ever get to the end of it.
One item that proved invaluable during my solo glassing extravaganza, turned out to be the mobile fiberglass dispenser, much more so than I would have anticipated. It basically behaved like a human helper by holding the fiberglass for me, without any complaints, and best of all, without drinking all my beer.
The only part that was a little tricky was the seam down the middle, where the overlap would occur. To avoid creating a bump in the middle, CP#28 highlights a different layup schedule from the plans.
 |
Modified layup schedule from CP#28 |
If you notice, items 1 and 3 specify the UNI to be laid at 45˚. The correct bias is 30˚, and that was a mistake later corrected in CP#29.
So, here’s how the work progressed...
 |
| Draping the 1st ply of UNI in the front section at 30˚ |
 |
| 1st ply rear layer |
 |
| Posing with the 1st ply rear section |
 |
| 1st, 2nd and 3rd (front only) plies completed |
 |
| Peel-ply added to the side |
 |
| Peel-ply added to the bottom |
The next day started with a backache from standing on a concrete floor for 12 hours straight. Later, I removed the peel-ply, and repeated the same process on the left side. As I mentioned, not the most mind challenging of layups, but it still took me 10 hours to get done.
 |
| Day 2: removing peel-ply from centerline |
 |
| 1st ply front section getting laid (lucky for him!) |
 |
| I begun by wetting the cloth to lock in the bias angle, before cutting the fiberglass |
 |
| 1st ply rear section |
 |
| More peel ply on the bottom... |
 |
| ... and on the side |
 |
| Proud parent |
There were quite a lot of sharp edges to cut off the next day...
 |
| Removing excess glass in the form of sharp edges |
... but I was finally rewarded with a completed fuselage that I can finally sit and make airplane noises in.
 |
| Ready for "show and tell" |
 |
| The girl with the "XX" tattoo |
 |
| Most peel-ply removed already |
 |
| "Man, that's a wide cockpit! I like it!" |
 |
| Plenty of room in the rear to keep the GIB cheery |


No comments:
Post a Comment