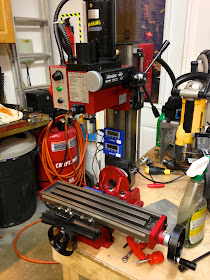
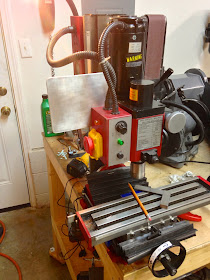
Mini-Mill's digital X and Y axis conversion
Manufacturing most of the metal parts for my airplane, implicitly meant accepting a longer building experience, this however didn’t mean that I couldn't improve my situation whenever I could.
One of the issue that was affecting my milling ability and precision was the Z axis backlash, this was effectively dealt with by installing a DRO (digital read out) on the mill column (see the conversion here). I have been very pleased with the outcome since the upgrade, and my machine is much more precise, faster, and easier to work with.
I have been considering doing the same thing to the X and Y axis for sometime, and I finally broke down and bought two remote display DROs.
Having DROs on all axis will turn my mini-mill into a “Cadillac”, so to speak. I will be able to precisely locate every feature of a new part quickly, accurately, and with excellent repeatability. The small backlash present on both axis will be irrelevant from now on, since I will be reading actual table movement, rather than hand-crank turns.
As always, nothing is ever “bolt on” at this level, and some minor adaptation had to be devised since there were no guidelines on how to mount them.
I found a good location for the X axis DRO behind the table, where I could keep it away from harm and below the table top. Instead of using the standoff brackets that came with the kit, I decided to mount it directly to the table, so I had to improvise my own mounts. This enabled me to save precious space, and not reduce the Y travel. I opened the sending unit, removed the circuit board, and drilled and counterbored two holes for 4 mm bolts, then with the unit in place, I drilled into the table to locate the matching holes.
 |
| Sending unit disassembled |
 |
| One hole will be enlarged, the other will be where the + sign is. |
 |
| Holes drilled and counterbored (unit upside down) |
 |
| Counterboring removed enough material to keep the head of the bolts flush |
 |
| Slide testing the sending unit |
Happy with the result, I tapped the holes.
 |
| Holes center-punched, drilled, and tapped. |
I had to also drill two holes on the DRO casing to allow me to tighten the bolts. I later put some tape over them to prevent chips and cutting fluid to get in it.
 |
| Back case drilled, and board reassembled. |
 |
| This is how I will tighten the bolts |
 |
| Sending unit in position. |
The Y axis proved a little easier, and did not require me to take the table down again. I just drilled and tapped two holes on the mill base, and one on the side of the sliding table. I adapted one of the brackets supplied with the kit and was back in business.
 |
| Tapping the first hole for the Y axis |
 |
| Rear Y axis hole |
 |
| X and Y axis sending units mounted on the mill |
 |
| Ops check... Good! |
 |
| I need to find a better place for the displays |
I know, the column is not a very good place to mount the DROs, since the mill head has to move up and down, so I made a bracket from a piece of scrap aluminum that came with my mill.
 |
| New "instrument panel"? |
 |
| The red box is plastic, but the instrument panel is very light weight |
 |
| Drilling and tapping a few more holes |
 |
| Voilà! 3 axis DRO mill! |
 |
| Close up of the panel |
I was able to route the wires away from all moving parts, including myself, and I feel pretty confident that they should be safe where they are.
 |
| Wiring DIY |


No comments:
Post a Comment