Back side (7.2 hrs)
The backside of the front seat was a little more involved. There was a 90˚ glass-to-glass bond to be made around the whole perimeter, and as we now know that means “flox corner”.
After trying different size saws and butcher knives to tackle the flox corner issue, I eventually got some sense into me and dusted off a never before used attachment to my Dremel.
This turned out to be the ideal solution I had been looking for to make quick, easy, fast, and uniform grooves in the foam to contain the flox.
This job hardly took any time, and looks much better than any previous attempt made with other cutting tools. Definitely the way to go here.
Grooves ready, the next step was to remove the dry micro-slurry behind the fiberglass, so I dug deeper into my decade old Dremel box, and found another attachment that, once thought ridiculous, finally redeemed itself by proving quite practical.
 |
| Flexible sanding disk attachment |
To prevent the epoxy from dripping underneath the piece, and onto the already glassed surface, I tried using duct tape all around the edges.
This worked quite well at isolating the surface, but unfortunately it proved difficult to remove in one piece. A better brand of tape might be necessary next time.
Again, micro-slurry was applied ...
... pure epoxy painted into the groove ...
... which was then filled with flox.
Having previously rounded the foam edges, the part was now ready for glassing. Note: in retrospect, I should have rounded them to a bigger radius.
Here’s where I slightly departed from the plans once again.
To reduce the chances of the landing speed-brake actuator mount (later glassed to the seat-back) breaking through the seat during a particular crash landing scenario, there have been a few revisions to the plans in this area.
Because these changes apply to the manual speed-brake, and I plan on using an electric actuator, the issue isn’t really germane, but I figured a little extra protection wouldn’t hurt, and because I still had kevlar lying around, I decided to add a bit to the seat-back. Weight be damned!
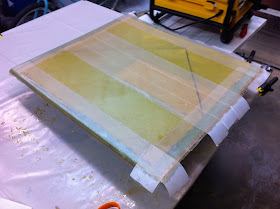
 |
| Kevlar (yellow) and BID |
The now usual sequence of events unfolded.
Worthy of notice is the fact that even warm, the pure epoxy had a tough time wetting the kevlar, and it took a lot of squeegeeing, and heat from a heat gun, to show it who’s the boss.
Peel-ply applied, and a day later, here’s what it looked like.
 |
| Note: the kevlar does not reach the sides, and it's contained within the fiberglass. This is to avoid ending up with ragged, unsandable kevlar edges. |
A few cuts and holes in strategic places, and voilà ... a Long EZ front seat is born.


No comments:
Post a Comment