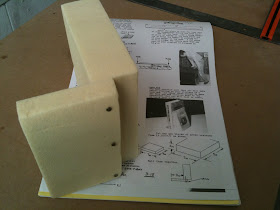
The last piece to be built in this chapter will be a bookend.
It is a piece that will bring together all the composite techniques employed thus far.
As usual we begin with the raw foam, except this time we will be using Urethane foam, instead of PVC foam.
Urethane foam is a very different animal.
For one thing the color is a slimy yellow, as opposed to the light PVC blue, and the consistency is really strange. Where PVC foam is pretty tough and hard to sand, Urethane is brittle and very easy to shape, so much so that you can use one piece of Urethane foam to sand another. It’s pretty cool actually, but it will give rise to a lot of Urethane dust that you don’t want to breathe in, so a mask is necessary.
Another difference is that, while you can cut PVC with a homemade hot wire cutter, you don’t want to do that with Urethane, as it gives off poisonous gasses.
After cutting the foam blocks, they are temporarily joined with nails.
Apply micro-slurry to the surfaces to be glassed, and dry-micro to the bigger holes and surface cracks, as well as where the pieces of foam meet.
In case you forgot, fiberglass doesn’t do corners well, so we apply a fillet of dry-micro to the inside corners, to smooth the transition from horizontal to vertical, thus avoiding the formation of air bubbles under the cloth.
With the surfaces readied, I applied three layers of BID cut at a bias, and wet them with epoxy (one layer at a time).
After the fiberglass dried (typically the next day), I trimmed off the excess, and shaped the foam-back into a wedge.
Next, I marked the foam-back, and later removed the perimeter area, where a glass to glass bond will be made.
Because I was wearing gloves wet with epoxy, I did not take any more photos of the back side in progress.
What I did is sculpt a central depression big enough to hold a photograph, slurried the whole back surface, dry-microed the hard corners around the perimeter, and any surface crack/holes, then laid the first two layers of glass, then my photograph, and finally the last layer of glass on top.
As you can see, the bottom is still unfinished.
The next steps were to remove the nails, and shave the bottom foam cleanly off. Sand the bottom of the fiberglass to remove foam and dried up slurry, then create a flox corner (by removing back foam around the fiberglass perimeter, sanding the dried slurry off the fiberglass, and filling the channel with flox).
Lastly glassing three more plies to the base of the book end.
This is how it turned out after trimming when dried.
It’s the only fiberglass piece my wife will allow in the house.


No comments:
Post a Comment